Wednesday, June 16, 2010

Graduation Cupcakes

I used the recipe for Best Cupcakes Ever on my recipe blog...

Here are pictures:


Friday, June 11, 2010

How To Draw A Skirt Pattern Tutorial

This is the skirt pattern that I created to use with the reversible skirt tutorial. But you can use this to create a simple skirt pattern for yourself. There is going to be a little bit of math to figure out for the skirt pattern. To draw the pattern, you are actually only going to draw a 4th of the whole skirt. The measurements include a 1/2 inch seam allowance.

from:Simply Modern Mom.

1. Measure the waist circumference and desired length of the skirt. Or grab a favorite skirt and use measurements from that.

2. The math equations for the different parts of the pattern are below. Look at the diagram to see where it is on the skirt.

waist = (waist circumference ÷ 4) + 3 inches

bottom = waist x 2

skirt length = measured length + 2 inches

3. Once you have your measurements, use scrap fabric or butcher paper to draw your pattern with the measurements.

4. When you are tracing the pattern piece onto your fabric, match the straight edge on the right side of the pattern to the fold of the fabric. You will need 2 of those pieces to make a whole skirt.

Reversible Skirt Tutorial

This is a great skirt for traveling or when you or your child spills something on the skirt just minutes after putting it on.

Remember even though I made the skirts for my daughter, you can make adult size of these skirts. I show you how to draft your own skirt pattern so you can make one for yourself.

from: Simply Modern Mom.

Supplies:
• 4 different fabrics
• matching thread
• 1-inch wide elastic
• sewing needle
• skirt pattern

1. Trace and cut out pattern on the fabrics. Make sure you have 2 of each piece in each color.

2. Do a basting stitch to the top of all skirt pieces. Then ruffle it to fit the bottom of the waistband pieces. Do to all 4 pieces.


3. Pin the skirt piece to the bottom of the waistband piece with the right sides together. Then sew at 1/2 seam. Then iron flat. Do to all four waist-skirt matching pieces.


4. Match the sides of the skirt pieces with the same colors. Pin in place then sew at 1/2 inch seam from top of waistband to bottom of skirt. But on one side of one of the skirts, leave an inch opening at the top of the waistband for the elastic to go through later. So essentially, you end up with two skirts.

  
5. Match the skirts right sides together. Like in the picture, on skirt is on the inside with the right side out, then cover with second skirt with right side in.

6. Sew around the top of the skirt at 1/2 inch seam. When you pull the skirts out, it should look like the picture below. Then flip one of the skirts inside the other and iron the top.

7. Next we work on the bottom of the skirt. Iron the bottom 1/2 inch seam into the inside of the skirt. Then match with the second skirt and sew as close to the edge as you can on the outside of the skirt.


8. For the elastic band, sew the bottom of the elastic casing over the top of the skirt at 1 1/4 inch from the top of the skirt. Remember, you should have an opening for the elastic.


9. Slip the elastic through. Using a safety pin will help. Then sew the two ends of the elastic together.


10. Whipstitch the opening close and you’re done!

Knot-Me Tie Skirt Tutorial

from: Simplymodernmom.com

This is another repurposed skirt. I used a jersey knit shirt for this skirt. And since it was made from a shirt, I wouldn’t suggest making it for child older than a year old. I used a small size woman’s shirt. It was the perfect width for this skirt that is probably a 12-month size. It is a pretty simple skirt to make. …
Supplies:

• jersey knit shirt
• matching thread
• needle
• 1/2 inch width elastic

1. Cut the shirt. Use the bottom of the shirt for the bottom of the skirt to save you hemming time. The best way to figure out the size is to grab a skirt of your child’s and measure the waist and length. I provided my measurements for a 12-month size and you can use that to figure out your measurements if that helps.

Waist circumference: 19 inches

Length: 9 inches


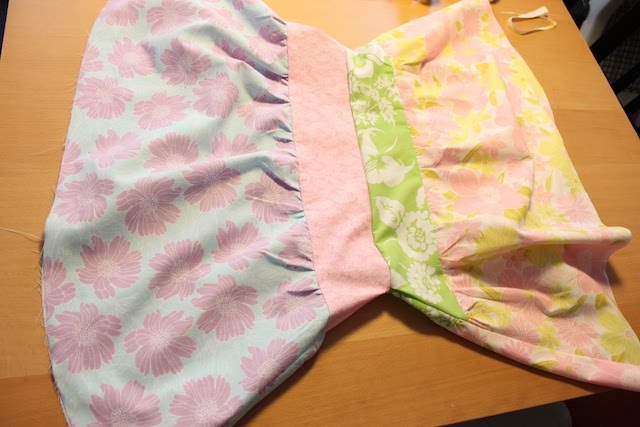
2. Cut your various pieces. The skirt bottom piece should be cut from the bottom of the shirt and kept as is. Don’t cut the sides. Keep this all one piece. The top piece includes the elastic casing. All measurements includes 1/4 inch seam allowance. These were my measurements…

Skirt bottom piece: 34 x 5 1/2 inches

Skirt top pieces: 9 x 4 inches (cut 2 pieces)

Tie pieces: 4 x 11 1/2 inch and 4 x 7 1/2 inch (cut one of each size)

* Note: In the picture I didn’t cut the top pieces to 9 inch length yet.

3. Take the 2 tie pieces (they are different sizes) fold in half lengthwise and iron it wrong side out. Then sew one short side and the open long side. Cut the corners at an angle so it will iron flat when you flip right side out.


4. Flip the ties right sides out then iron flat.


5. Pin the ties to the top pieces. Allow room for the elastic casing. I pinned the top of the ties at 1 3/4 inches down from the top of the piece. Place the second top piece on top of it and sew the two edges. Since I don’t have a serger, I zig-zagged over the seam to keep it all in place.


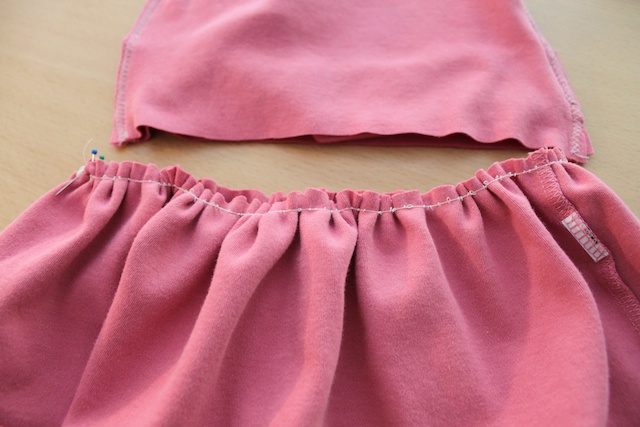
6. With the bottom of the skirt right side out, do a basting stitch at 1/4 inch from the top. Then scrunch the skirt to fit the bottom of the skirt top piece.

7. With the skirt top piece right side out, match the bottom edge of the skirt top piece to the scrunched edge of the skirt bottom piece. The skirt top piece is on the inside of the skirt bottom piece. Pin it in place. Then sew it in place with a straight line with a 3/5 inch seam. Then zig zag stitch over the seam.


8. Iron the 3/4 inch seam for the elastic casing into the inside of the skirt. Sew it all the way around, but leave a slight opening to put the elastic in the casing.


9. Pull elastic through the casing. Then sew the ends of the elastic together. Pull the elastic back into the casing then sew the hole close.


10. Tie a knot by doing a square knot or in my case I think I did right over left then right over left again. You’ll have to play with it to get it just right. Then Sew the knot to the skirt through the inside of the skirt so it doesn’t get weighed down and droop. And you’re done.