Showing posts with label Girls Projects. Show all posts

Thursday, August 5, 2010

Crochet Hair Bows

From: http://www.ohsohappytogether.blogspopt.com/

You can make them however big or little you like.


What you need:
-Yarn
-Crochet Hook
-Hot Glue Gun
-Fabric Glue
-Yarn Needle
-Optional: ribbon covered hair clip

1. Start by making a chain.


2. Then sc in 2nd ch from hook and sc across.

3. Then turn and create the next row on top with sc stitches. Make as many rows as you like.


4. Once you are done with the last row, start to sc around the whole rectangle, except for the top row you just did. This cleans up the edges. I also try to crochet over the beginning strand of yarn that is left.
5. Then take your yarn needle and thread in the end(s). Make sure the ends are coming out of the back of the rectangle as you will then cut them and dab a little bit of fabric glue over them.
6. Create the middle piece the same way as in steps 1-2. Make it long enough to go around the rectangle to glue. Then tie the ends together and trim excess yarn.

7. Dab a dot of glue from your hot glue gun on the middle front large rectangle.

8. Quickly place the middle piece on it, making sure the middle is on the glue.
9. Then turn over and do a dab of hot glue on the middle back and quickly pull over the front piece and hold in place until dry.

10. Repeat for the other side, but this side will lie on top of the other end of the middle piece.
And there's your bow. So nice and cute.

If you like, you can glue on a hair clip or whatever.

One is perfect to hold side hair back.

Or add two onto ponytails!

Friday, June 11, 2010

Knot-Me Tie Skirt Tutorial

from: Simplymodernmom.com

This is another repurposed skirt. I used a jersey knit shirt for this skirt. And since it was made from a shirt, I wouldn’t suggest making it for child older than a year old. I used a small size woman’s shirt. It was the perfect width for this skirt that is probably a 12-month size. It is a pretty simple skirt to make. …
Supplies:

• jersey knit shirt
• matching thread
• needle
• 1/2 inch width elastic

1. Cut the shirt. Use the bottom of the shirt for the bottom of the skirt to save you hemming time. The best way to figure out the size is to grab a skirt of your child’s and measure the waist and length. I provided my measurements for a 12-month size and you can use that to figure out your measurements if that helps.

Waist circumference: 19 inches

Length: 9 inches


2. Cut your various pieces. The skirt bottom piece should be cut from the bottom of the shirt and kept as is. Don’t cut the sides. Keep this all one piece. The top piece includes the elastic casing. All measurements includes 1/4 inch seam allowance. These were my measurements…

Skirt bottom piece: 34 x 5 1/2 inches

Skirt top pieces: 9 x 4 inches (cut 2 pieces)

Tie pieces: 4 x 11 1/2 inch and 4 x 7 1/2 inch (cut one of each size)

* Note: In the picture I didn’t cut the top pieces to 9 inch length yet.

3. Take the 2 tie pieces (they are different sizes) fold in half lengthwise and iron it wrong side out. Then sew one short side and the open long side. Cut the corners at an angle so it will iron flat when you flip right side out.


4. Flip the ties right sides out then iron flat.


5. Pin the ties to the top pieces. Allow room for the elastic casing. I pinned the top of the ties at 1 3/4 inches down from the top of the piece. Place the second top piece on top of it and sew the two edges. Since I don’t have a serger, I zig-zagged over the seam to keep it all in place.


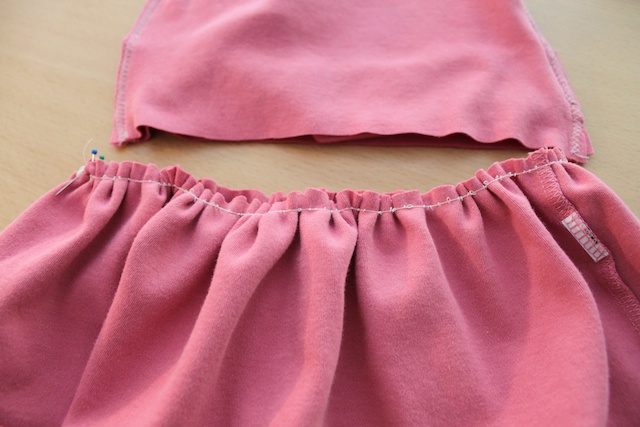
6. With the bottom of the skirt right side out, do a basting stitch at 1/4 inch from the top. Then scrunch the skirt to fit the bottom of the skirt top piece.

7. With the skirt top piece right side out, match the bottom edge of the skirt top piece to the scrunched edge of the skirt bottom piece. The skirt top piece is on the inside of the skirt bottom piece. Pin it in place. Then sew it in place with a straight line with a 3/5 inch seam. Then zig zag stitch over the seam.


8. Iron the 3/4 inch seam for the elastic casing into the inside of the skirt. Sew it all the way around, but leave a slight opening to put the elastic in the casing.


9. Pull elastic through the casing. Then sew the ends of the elastic together. Pull the elastic back into the casing then sew the hole close.


10. Tie a knot by doing a square knot or in my case I think I did right over left then right over left again. You’ll have to play with it to get it just right. Then Sew the knot to the skirt through the inside of the skirt so it doesn’t get weighed down and droop. And you’re done.

Wednesday, March 31, 2010

Beaded Headband

This was a quick and easy craft to do with girls. They areable to pick out the beads and thread the elastic through. We made this one with whatever beads we had lying around. I used two different colored elastic to help you see the instructions clearly.


Supplies:

• elastic strings
• beads


1. Measure the head size of your child or you for a headband then give lots of room to spare. Then tie a knot on one side about 3-4 inches from the end.

2. Thread the first elastic with beads. For me, I just had Kaye bead enough to cover from ear to ear. Tie the other end when you’re through.

3. Thread the second elastic with beads. Same as the last step.

4. Tie both elastic strings together at where the beads end. Do to both sides.


5. Remeasure the head and tie both open ends together so it meets at the bottom of the headband.

Monday, March 29, 2010

Make your own Sports Headband Tutorial

from : dasiesandmore.blogspot.com

If you have a daughter who plays on sports teams or if you like to work out and you wear the "sports style" headbands with a ponytail - this tutorial is for you! Don't want to pay $8-$18 for a headband? Make one yourself for cheap!


You need:

• A sewing machine (or patience and good eyesight for hand sewing)

• 7/8" wide grosgrain ribbon of your choice (background color) ($1.97 or less - look for coupons)

• 5/8" wide grosgrain ribbon of your choice (top color) ($1.97 or less)

• 3/8" wide grosgrain ribbon that matches either of the two previous colors ($1.97 or less)

• 7/8" wide velvet ribbon (this is the hardest to find - check Hobby Lobby for $1.99 spools of 6 ft of ribbon that are often half price or check other fabric stores in the "by the yard" ribbon - black or brown work well, white is good for lighter colors)

• Fabric glue ($4 or so a bottle) - hot glue does NOT work for this, sorry, it is too stiff

• Invisible thread or thread that matches both of your ribbon colors

• Two "adult" size "no metal" thick ponytail holders

• Scissors

• Measuring tape

Step 1

Cut the 7/8" wide and 5/8" wide grosgrain ribbons to 15 1/2" long for a child's size headband or 16 1/2" long for a teen or adult headband.


Step 2

Cut the 7/8" wide velvet ribbon to 14" (kids) or 15" (adult) - you could cut it the same length as the grosgrain, but depending on your spool of ribbon you may be able to get an extra headband out of the spool if you cut it a bit shorter.

Step 3

Use the fabric glue and run a small line of fabric glue down each long edge of the 5/8" grosgrain ribbon. If this ribbon is a dark color, you could put one line down the middle, but lighter colors will show the glue line if you put it in the middle. Glue the 5/8" ribbon to the middle of the 7/8" ribbon - putting the ribbon down carefully so that the edges are even.

Step 4

Using invisible thread (or thread that matches the color of the 5/8" ribbon) sew down the edge of the 5/8" ribbon.

Step 5

Run a line of glue down the velvet ribbon. Glue this to the back of the 7/8" grosgrain ribbon. There will be a gap at each end of the ribbon where it is not covered by velvet - this is okay, it won't show.

Step 6

Using invisible thread (or thread that matches the color of the 7/8" grosgrain ribbon) carefully and slowly (especially if you are using invisible thread) sew down the edge of the velvet ribbon to attach it securely to the grosgrain ribbon.

Step 7

Take the two ponytail holders and knot them together. This is slightly difficult to explain, but I don't have a internet-compatible video camera, so I'm going to have to do the best I can. You're going to find the spot on each ponytail holder where they have been stuck together. Lay the two ponytail holders on top of each other with the connection spots on opposite sides of the circle from each other. Loop one side of one ponytail holder around the other and pull taught. Hopefully the pictures below help explain this.


Step 8

Fold the end of the ribbon from Step 6 over one side of the ponytail holder. Sew in place, going back-and-forth several times over the end to make sure it doesn't pull out. Repeat with the other side.

Step 9

Cut two pieces of 3/8" grosgrain ribbon to 2 1/2" long. Heat seal the ends (run a lighter or match quickly and carefully across the cut end of the ribbon and it will melt together slightly and prevent fraying). Put a line of fabric glue on each 2 1/2" piece.

Step 10

Fold these short pieces over the sewn part of the headband for a nicer looking finish. Allow to dry before putting in anyone's hair.


You can replace the "team colors" with a patterned 7/8" grosgrain ribbon like I did below, and you omit steps 3 &

4. (See photo of Kate below with the zebra print headband on.) Or you can move up a size and use 1 1/2" grosgrain ribbon and velvet ribbon, and 7/8" for the top piece (or again use a patterned ribbon).

You can find Razorback ribbon at some of the Wal-Mart stores so you could make "game day" headbands for you and your friends.