Have ever finished editing a photo, looked at it and thought “This looks so awesome! I’m in awe of my mad Photoshop skillz!” only to be ridiculously deflated after you upload it to your blog or favorite forum? Yeah. Been there done that… a lot! Ok, well maybe not the whole gloating over my mad Photoshop skillz part! But definitely I’ve disappointed at the lack of zing in my photos.
I think there’s something hidden deep inside the internet insides that loves to zap all the zing out of photos when they’re uploading. Did you know there’s something you can do about it? You did? Well, that’s fantastic! I think I must have been living under a rock all this time, because I just now figured this out. :) So, in case there’s any more of you out there like me, wondering why your photos don’t look as great on the web as they do on your desktop, here is the solution!
It is so super easy to do, and you can do it in Photoshop and Elements!
Step One – First, complete the edits you’d like to your photo. Then resize your photo to the size you’d like for your blog or forum, ect.
Step Two – Next, click on File > Save for Web & Devices (for Photoshop) or File > Save for Web (for Elements).
Step Three (Photoshop) – Now you should have a box that looks like this in Photoshop. By default, it should be set to Optimized. That’s where I leave it. Next, make sure you have JPEG selected, then click on Save.
Step Three (Elements) – This is what the box will look like in Elements. By default, it has GIF selected, so just click on the drop-down menu and select JPEG. Just under that menu, you’ll find the Quality setting. I set that to Maximum and it automatically sets it to 100. Now click on OK.
Step Four – Next, name your file and save it to the location you’d like on your computer.
That’s it! Now you can upload your photos to the web and they’ll look just as they did on your desktop!
Showing posts with label Photos. Show all posts
Friday, September 17, 2010
Friday, August 6, 2010
How to make a Giant Wall Poster
Blockposters.com that we finally agreed. The process is really simple and easy to do.
Let's get started:
Step One: Upload an image. We chose a picture from digitalblasphemy.com. The image you upload can't be larger than 1mb so you may need to resize.
Step Two: Choose how large you want your image and what position you want it in. We chose landscape with it being 5 pages wide, 6 pages tall.
Step Three: Your image is then made into a PDF that you can print off on your home computer.
Step Four: There will be a white edge around each page that you'll need to cut off.
Step Five: Attach the sheets of paper to your surface. We used 3m mounting squares cut into tiny pieces in each corner. We then eyeballed each piece as we attached them to the wall.
I think this project is so versatile. Imagine the possibilities. Print the pictures in color and do a large family photo or your teenage daughter's latest celebrity crush. If my hubby would have let me, this image would have been the New York skyline, a huge damask print or a chevron pattern. Seriously, the possibilities are endless!
Let's get started:
Step One: Upload an image. We chose a picture from digitalblasphemy.com. The image you upload can't be larger than 1mb so you may need to resize.
Step Two: Choose how large you want your image and what position you want it in. We chose landscape with it being 5 pages wide, 6 pages tall.
Step Three: Your image is then made into a PDF that you can print off on your home computer.
Step Four: There will be a white edge around each page that you'll need to cut off.
Step Five: Attach the sheets of paper to your surface. We used 3m mounting squares cut into tiny pieces in each corner. We then eyeballed each piece as we attached them to the wall.
I think this project is so versatile. Imagine the possibilities. Print the pictures in color and do a large family photo or your teenage daughter's latest celebrity crush. If my hubby would have let me, this image would have been the New York skyline, a huge damask print or a chevron pattern. Seriously, the possibilities are endless!
Thursday, July 29, 2010
Editing A Photo’s Background With The Patch Tool
Written by Rachel Durik
Have you ever looked through your pictures thinking, “If only I had just moved this little thing out of the way!”
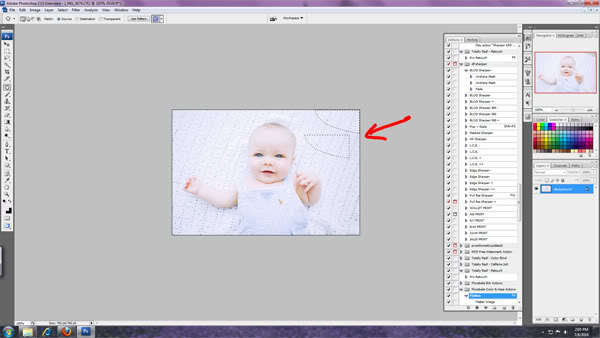
Yes, ideally you get the perfect background in camera. But sometimes you don’t catch something until later. Take this shot. I should have noticed that the blanket didn’t cover the frame entirely. But while I was shooting, I got lost in this little guys beautiful eyes and just didn’t see it until post. In times like this, I use the lasso and patch tools to do a little fix.
I’m working in Photoshop CS3 on a PC.
First, select the lasso tool and make a selection around the area you want to fix. After you’ve lassoed it, click the button on the top toolbar to refine the edge.
Adjust the sliders so that you’ve got a smooth, feathered selection. This will prevent your selection from having harsh, obvious fixed edges.
With your selection in place, click on the patch tool. It’s at the same place your healing brush tool is (which looks like a bandage). Hold the healing brush tool down for a few selections, and you’ll see a drop down menu appear. Select the patch tool. On the toolbar up top, be sure that you’ve checked “Source” for the fix, and not “destination”.
Move your selection to a place with a similar look. In this case, I’m going to choose a nearby patch of blanket, making sure that the lines of the blanket still match up.
When you’ve found the right spot, just release your selection and Photoshop will combine the source and the destination to make a nicely matched fix. Voila!
Rachel Durik is a photographer located in Southwest Florida. You can learn more by visiting her photography site, Savor Photography, Naples Wedding Photographer, the Savor facebook page, and her personal blog http://www.americanmum.blogspot.com/
Have you ever looked through your pictures thinking, “If only I had just moved this little thing out of the way!”
Yes, ideally you get the perfect background in camera. But sometimes you don’t catch something until later. Take this shot. I should have noticed that the blanket didn’t cover the frame entirely. But while I was shooting, I got lost in this little guys beautiful eyes and just didn’t see it until post. In times like this, I use the lasso and patch tools to do a little fix.
I’m working in Photoshop CS3 on a PC.
First, select the lasso tool and make a selection around the area you want to fix. After you’ve lassoed it, click the button on the top toolbar to refine the edge.
Adjust the sliders so that you’ve got a smooth, feathered selection. This will prevent your selection from having harsh, obvious fixed edges.
With your selection in place, click on the patch tool. It’s at the same place your healing brush tool is (which looks like a bandage). Hold the healing brush tool down for a few selections, and you’ll see a drop down menu appear. Select the patch tool. On the toolbar up top, be sure that you’ve checked “Source” for the fix, and not “destination”.
Move your selection to a place with a similar look. In this case, I’m going to choose a nearby patch of blanket, making sure that the lines of the blanket still match up.
When you’ve found the right spot, just release your selection and Photoshop will combine the source and the destination to make a nicely matched fix. Voila!
Rachel Durik is a photographer located in Southwest Florida. You can learn more by visiting her photography site, Savor Photography, Naples Wedding Photographer, the Savor facebook page, and her personal blog http://www.americanmum.blogspot.com/
Friday, July 23, 2010
Friday, May 7, 2010
Black and White Photo Bracelet
From: www.thehowtogal.blogspot.com
The following tutorial was made using Photoshop, but the same principles apply with any photo editing software.
This is a two part tutorial- first half I'll show how to "Through The View Finder-ize" your pictures and the second half is the bracelet tutorial.
Part 1- Through the View Finder Tutorial
http://www.flickr.com/photos/mothtoflame/2806262468/in/pool-ttvdust
Part 2- Bracelet Tutorial
What you need:
• Paper Cutter
• Scissors
• Packing Tape
• Cardboard (you could use any material really, as long as you could punch holes in the sides for the jump rings. Felt or scrabble tiles might work!)
• Sharp Instrument- nail, stylus (I used this), etc
• Jump Rings
• Jewelry Clasp
• TTV Pictures (I used 9)
Let's Get Started!
Resize your images to 1in x 1in and print. Cut each square out and glue onto a thick piece of cardboard.
Cut cardboard pieces out.
Note: I covered the back part of the cardboard with a floral paper to hide that it was cardboard. :)
Place a picture square face down onto the sticky part of a piece of packing tape making sure that it is smooth. Then, cut the corners out of the tape and seal the picture piece into the tape.

Complete for all of your squares.

Punch holes in each side of your square
Attach jump rings on each side of your picture squares.
Connect all of your squares until you have a bracelet large enough to fit around your wrist. Complete the circle but attaching your jewelry clasp to the last two pieces.
A beautiful, very inexpensive bracelet! I made one for myself, too- I love it!!
The following tutorial was made using Photoshop, but the same principles apply with any photo editing software.
This is a two part tutorial- first half I'll show how to "Through The View Finder-ize" your pictures and the second half is the bracelet tutorial.
Part 1- Through the View Finder Tutorial
Select a picture and crop it into a perfect square.
In Photoshop, turn the picture black and white: Image-Adjustments-Black & White. It will come up with a menu for you to adjust the levels manually, but just click through that. Your image will now be black and white.
Next, I love images that have striking black and white contrast. If you do, too select: Image-Adjustments-Brightness/Contrast.
Adjust the levels according to your preference.
Pick the Through the Viewfinder image you would like for your picture. There are a TON of images HERE in the TTV Flickr pool. I chose this one. Save it to your computer and open it next to your picture in Photoshop. Drag the TTV image on top of your picture. Note: I made my picture the same size as the view finder image (500px by 500px) to make it easy.
Make sure the TTV image layer is selected and change the layer selection to "darken." This will make your picture show through. Note: there are many different options to choose from and you may like some of the other selections like overlay, soft light or hue better. Play around with it until you get something you like.
Once you have all of your images Through the View Finder- ized you can head into making the bracelet.
Part 2- Bracelet Tutorial
What you need:
• Paper Cutter
• Scissors
• Packing Tape
• Cardboard (you could use any material really, as long as you could punch holes in the sides for the jump rings. Felt or scrabble tiles might work!)
• Sharp Instrument- nail, stylus (I used this), etc
• Jump Rings
• Jewelry Clasp
• TTV Pictures (I used 9)
Let's Get Started!
Resize your images to 1in x 1in and print. Cut each square out and glue onto a thick piece of cardboard.
Cut cardboard pieces out.
Note: I covered the back part of the cardboard with a floral paper to hide that it was cardboard. :)
Place a picture square face down onto the sticky part of a piece of packing tape making sure that it is smooth. Then, cut the corners out of the tape and seal the picture piece into the tape.

Complete for all of your squares.

Punch holes in each side of your square
Attach jump rings on each side of your picture squares.
Connect all of your squares until you have a bracelet large enough to fit around your wrist. Complete the circle but attaching your jewelry clasp to the last two pieces.
A beautiful, very inexpensive bracelet! I made one for myself, too- I love it!!
Thursday, May 6, 2010
How to Create a Watermark
from: http://www.kidnappedbysuburbia.com/
I am not a professional photographer, so I use watermarks solely to protect my images since I’ve found them on other blogs and websites before. If I ever do decide to become a professional, I’ll have a professional logo worked up by a professional, but for now, this one does the trick.
The first thing I did was try to think about something I like … and dandelions came to mind. Okay, I hate that we have 748 of these weeds in our yard rather than beautiful green grass, but I love photographing them, and Emma loves picking and blowing them. And I really do think they’re pretty.
So I decided to find a Photoshop dandelion brush. Brush? What’s that?
Brushes are just that – a sort of digital paintbrush that you can use to create different effects. You can use a paint splatter brush to “brush” a paint splatter on an image using your Photoshop brush tool.
I don’t really know if that explains it very well, but if you keep reading the tutorial, I think it will make sense by the end.
Anyway, a quick Google search was all it took to find a great dandelion brush. I just downloaded the brush set and then installed it into Photoshop Elements 5.0 (I know, it’s ancient, but it works for my needs) using these instructions.
How to http://graphicssoft.about.com/od/pselements/qt/freegoodies.-T0Y.htm Install CustoHow to Use Free Photoshop Content in Photoshop Elements
I had to restart Photoshop once they were installed.
Now, I could have created a transparent image that I can just drag onto each photo I want to watermark to make things about eight thousand times easier, but for the sake of this tutorial, I’m just going to show you how to put the watermark directly onto your photo.
Step 1: Open image in Photoshop
Step 2: Select the brush tool
It may look different in the various versions of Photoshop, but it should look like a paintbrush.
Step 3: Select the brush set that holds the brush you want to use – in my case, the set is called “flower brushes”
Step 4: Select the brush you want to use – in my case, it’s “17” or the dandelion brush
Step 5: Change brush size to suit your needs. You can also change the opacity of the brush if you need to. I left this step out because my dandelion brush is very light already, but if you’re using a heavier brush image, then you might want to make the opacity lighter so it doesn’t take away from your photo.
Step 6: Move brush to wherever you want to stamp it and then click your mouse just once. You won’t be able to “move” it once you stamp it, so make sure you put it in just the right spot the first time (or you can undo and redo it, of course).
Step 7: Once you have it brushed in just the right spot, then you can add your text around it.
Step 8: Change opacity of text, if necessary.
And you’re done!
The great thing about Photoshop brushes is that you can use them for LOTS of things. I used 2 cute little bee brushes to create my personal blog header image, and then I used a bee brush and a bird brush to create my RSS feed and Twitter buttons.
If you use brushes that you’ve found online, please use good etiquette in giving credit. (I put the link to the website where I got my blog header and button brushes in my footer.) Most brush creators don’t require you to give credit, but it’s always nice, IMO.
My favorite place to find free Photoshop brushes is Brusheezy, but you can usually find any brush your heart desires by doing a quick Google search.
My Next Tutorial: creating and saving your own brush so you don't have to create a watermark for every photo!
I am not a professional photographer, so I use watermarks solely to protect my images since I’ve found them on other blogs and websites before. If I ever do decide to become a professional, I’ll have a professional logo worked up by a professional, but for now, this one does the trick.
The first thing I did was try to think about something I like … and dandelions came to mind. Okay, I hate that we have 748 of these weeds in our yard rather than beautiful green grass, but I love photographing them, and Emma loves picking and blowing them. And I really do think they’re pretty.
So I decided to find a Photoshop dandelion brush. Brush? What’s that?
Brushes are just that – a sort of digital paintbrush that you can use to create different effects. You can use a paint splatter brush to “brush” a paint splatter on an image using your Photoshop brush tool.
I don’t really know if that explains it very well, but if you keep reading the tutorial, I think it will make sense by the end.
Anyway, a quick Google search was all it took to find a great dandelion brush. I just downloaded the brush set and then installed it into Photoshop Elements 5.0 (I know, it’s ancient, but it works for my needs) using these instructions.
How to http://graphicssoft.about.com/od/pselements/qt/freegoodies.-T0Y.htm Install CustoHow to Use Free Photoshop Content in Photoshop Elements
I had to restart Photoshop once they were installed.
Now, I could have created a transparent image that I can just drag onto each photo I want to watermark to make things about eight thousand times easier, but for the sake of this tutorial, I’m just going to show you how to put the watermark directly onto your photo.
Step 1: Open image in Photoshop
Step 2: Select the brush tool
It may look different in the various versions of Photoshop, but it should look like a paintbrush.
Step 3: Select the brush set that holds the brush you want to use – in my case, the set is called “flower brushes”
Step 4: Select the brush you want to use – in my case, it’s “17” or the dandelion brush
Step 5: Change brush size to suit your needs. You can also change the opacity of the brush if you need to. I left this step out because my dandelion brush is very light already, but if you’re using a heavier brush image, then you might want to make the opacity lighter so it doesn’t take away from your photo.
Step 6: Move brush to wherever you want to stamp it and then click your mouse just once. You won’t be able to “move” it once you stamp it, so make sure you put it in just the right spot the first time (or you can undo and redo it, of course).
Step 7: Once you have it brushed in just the right spot, then you can add your text around it.
Step 8: Change opacity of text, if necessary.
And you’re done!
The great thing about Photoshop brushes is that you can use them for LOTS of things. I used 2 cute little bee brushes to create my personal blog header image, and then I used a bee brush and a bird brush to create my RSS feed and Twitter buttons.
If you use brushes that you’ve found online, please use good etiquette in giving credit. (I put the link to the website where I got my blog header and button brushes in my footer.) Most brush creators don’t require you to give credit, but it’s always nice, IMO.
My favorite place to find free Photoshop brushes is Brusheezy, but you can usually find any brush your heart desires by doing a quick Google search.
My Next Tutorial: creating and saving your own brush so you don't have to create a watermark for every photo!
Friday, April 9, 2010
Photo Tiles
4x4 Tumbled Tiles
Tissue Paper
Modge Podge
Tape
4x4 cork
Foam Brush
Permanent Glue
Clear Acrylic Sealer
They shouldn't if you seal them with enough coats. I applied a layer of ModPodge over my pictures and then sealed the whole top of the tile with Crystal Clear Enamel Spray twice. I've heard Acrylic sealer works as well. The mod podge with the spray worked best for me.
Melody Steiner
Fri Oct 23, 2009 at 1:31 PM
My ink keeping running when I apply the mod podge on top of the photo. I am using a b&w photo, printed out on fast normal and let it dry several hours. Any suggestions? Thanks!
Donna
Wed Nov 4, 2009 at 3:42 PM
I am also having a problem with the ink running when i apply the mod podge I am using an inkjet printer and I let the photos dry for a couple of days. The other problem i am having is when i use a foam brush the foam seems to be giving the mod podge a purple tint. Ive tried several different foam brushes.
Heather
Mon Nov 9, 2009 at 6:13 PM
Check and make sure you are not using the shiny side of the tissue paper, maybe use only black and white ink that is waterproof. Hope this helps.
Cathy Sue
Tue Nov 10, 2009 at 6:03 AM
I've been making a lot of coasters like this. It's best to make photo copies of your images - I do it at Kinkos. I can fit six 4" x 4" images on a 8 1/2 x 14 page (same price as 8 1/2 x 11). I use the mod podge to stick the image & seal it - Then I brush on a few coats of polyurethane - water based is easier to clean up & less toxic. (you can also use use spray). I've found the coasters hold up pretty well to heat from hot cup but nothing hotter - like a hot pot off the stove. Happy coastering!
Laurie
Tue Dec 1, 2009 at 10:21 PM
Hi! would like to know how to keep the picture from getting wrinkles in it.
To help prevent wrinkles, only apply a light coat of mod podge before you put your picture on the tile; Then let the picture dry completely before you add the layer of mod podge over the picture.
Melody
Fri Dec 11, 2009 at 4:25 PM
Would this technique work with a standard photo?
Wendi
Wed Dec 16, 2009 at 10:10 PM
I have printed pictures on regular copy paper on a ink jet printer and they turned out BEAUTIFUL! I use the little bathroom tiles 2x2 and make magnets. The key with paper and the ink jet printer is to spray the picture with acrylic sealer after it dries BEFORE you put it on the tiles. I print out all of the pictures on a 8.5 x 11 page and let it dry for an hour. I then spray a light coat of sealer over the page. Not too close - you don't want spots.
Then cut, modge podge, add a magnet to the back and Whalla - you have personal magnets for the Fridge.
Happy Holidays!
Kristi
Sat Dec 19, 2009 at 10:26 AM
I have done both black & white and color. I always have success with b/w. I have found that when I do color it runs when the picture is printed on the 'glossy' side. I have total success when I print on the 'dull side' of the tissue paper. Remember to let the picture dry completely or else the colors will run! Hope that helps!
Kimberly
Tue Dec 22, 2009 at 3:38 AM
Tissue Paper
Modge Podge
Tape
4x4 cork
Foam Brush
Permanent Glue
Clear Acrylic Sealer
They shouldn't if you seal them with enough coats. I applied a layer of ModPodge over my pictures and then sealed the whole top of the tile with Crystal Clear Enamel Spray twice. I've heard Acrylic sealer works as well. The mod podge with the spray worked best for me.
Melody Steiner
Fri Oct 23, 2009 at 1:31 PM
My ink keeping running when I apply the mod podge on top of the photo. I am using a b&w photo, printed out on fast normal and let it dry several hours. Any suggestions? Thanks!
Donna
Wed Nov 4, 2009 at 3:42 PM
I am also having a problem with the ink running when i apply the mod podge I am using an inkjet printer and I let the photos dry for a couple of days. The other problem i am having is when i use a foam brush the foam seems to be giving the mod podge a purple tint. Ive tried several different foam brushes.
Heather
Mon Nov 9, 2009 at 6:13 PM
Check and make sure you are not using the shiny side of the tissue paper, maybe use only black and white ink that is waterproof. Hope this helps.
Cathy Sue
Tue Nov 10, 2009 at 6:03 AM
I've been making a lot of coasters like this. It's best to make photo copies of your images - I do it at Kinkos. I can fit six 4" x 4" images on a 8 1/2 x 14 page (same price as 8 1/2 x 11). I use the mod podge to stick the image & seal it - Then I brush on a few coats of polyurethane - water based is easier to clean up & less toxic. (you can also use use spray). I've found the coasters hold up pretty well to heat from hot cup but nothing hotter - like a hot pot off the stove. Happy coastering!
Laurie
Tue Dec 1, 2009 at 10:21 PM
Hi! would like to know how to keep the picture from getting wrinkles in it.
To help prevent wrinkles, only apply a light coat of mod podge before you put your picture on the tile; Then let the picture dry completely before you add the layer of mod podge over the picture.
Melody
Fri Dec 11, 2009 at 4:25 PM
Would this technique work with a standard photo?
Wendi
Wed Dec 16, 2009 at 10:10 PM
I have printed pictures on regular copy paper on a ink jet printer and they turned out BEAUTIFUL! I use the little bathroom tiles 2x2 and make magnets. The key with paper and the ink jet printer is to spray the picture with acrylic sealer after it dries BEFORE you put it on the tiles. I print out all of the pictures on a 8.5 x 11 page and let it dry for an hour. I then spray a light coat of sealer over the page. Not too close - you don't want spots.
Then cut, modge podge, add a magnet to the back and Whalla - you have personal magnets for the Fridge.
Happy Holidays!
Kristi
Sat Dec 19, 2009 at 10:26 AM
I have done both black & white and color. I always have success with b/w. I have found that when I do color it runs when the picture is printed on the 'glossy' side. I have total success when I print on the 'dull side' of the tissue paper. Remember to let the picture dry completely or else the colors will run! Hope that helps!
Kimberly
Tue Dec 22, 2009 at 3:38 AM
Thursday, April 1, 2010
Wedding Photo Centerpeice
I had my sweet hubby cut blocks for me. Then I painted them 2 coats of "linen".
While the paint dried........I printed out and cut down some pics from their engagement photo shoot. Then, I used some "Aleene's Tacky Glue" (super cheap!) to stick the pics down. Regular glue or Mod Podge probably wouldn't work since the pics are thick.
On mine, I added some vinyl words to one side of each block to personalize them for the happy couple. You can also use stickers or rub-ons to add words to get a similar look.
Be sure to wait plenty of time to let the glue dry and then spray with a clear finishing spray or apply a few coats of Mod Podge.

BE SURE TO WAIT AT LEAST A WEEK BEFORE STACKING THESE OR THEY WILL STICK TOGETHER.........the finish needs time to cure. You don't want to spend all that time making these cute blocks only to have them stick together and rip your photos off.
While the paint dried........I printed out and cut down some pics from their engagement photo shoot. Then, I used some "Aleene's Tacky Glue" (super cheap!) to stick the pics down. Regular glue or Mod Podge probably wouldn't work since the pics are thick.
On mine, I added some vinyl words to one side of each block to personalize them for the happy couple. You can also use stickers or rub-ons to add words to get a similar look.
Be sure to wait plenty of time to let the glue dry and then spray with a clear finishing spray or apply a few coats of Mod Podge.

BE SURE TO WAIT AT LEAST A WEEK BEFORE STACKING THESE OR THEY WILL STICK TOGETHER.........the finish needs time to cure. You don't want to spend all that time making these cute blocks only to have them stick together and rip your photos off.
Thursday, March 11, 2010
ABC Book
I really wanted to make these for my Jordan!! I had a couple purposes in mind. First of all, I want to help teach her her ABC's in a fun creative way! I knew that we would get good use out of them. Secondly, I want her to know her family and have a "memory book" of photos!
It turned out to be more of a challenge than I originally thought, but mostly because I wasn't aware of a few things, and ended up changing my mind on a couple other things. Regardless, I'm pleased with the result, and I would definitely do them again.
One major tip--photos cannot be laminated. Either use color copies of your photos, or use non-heat self laminating sheets (which is what I used).
It turned out to be more of a challenge than I originally thought, but mostly because I wasn't aware of a few things, and ended up changing my mind on a couple other things. Regardless, I'm pleased with the result, and I would definitely do them again.
One major tip--photos cannot be laminated. Either use color copies of your photos, or use non-heat self laminating sheets (which is what I used).
Wednesday, March 10, 2010
Mod Podge Family Monogram
Do you ever see a project that you see that you get a little giddy about doing? Well, this one made me giddy. I just had to make one for my family!! I found it best to copy the pictures my my printers draft setting, it made them a little lighter and easier to see, plus it saved ink! I mod podged the pictures on and carefully worked on the edges and then made a thin layer of mod podge over the whole thing. End of story, love it!
Here is the side view: And here is a picture of the scale all 23.5 inches of its glory and where it lives happily in my entry way.
Another Blogger's Post:
I thought it would be cute if the kiddo’s had their first initial hanging above their bed. I was originally just going to paint these, and then I thought it would be cuter if I mod podged photos of themselves on the letter. Kinda like a photo collage of their first 3 years.
So here's the tutorial:
I bought these cheap-o cardboard letters at Joanns. I think they were about $7-$8 a piece, and they are pretty big - about 2 feet tall.
Supplies:
mod podge
tons of photos
brush
scissors
I printed out a ton of photos (at least 50) on regular computer paper. Photo paper is much more stiff and a lot more difficult to work with, so I just used the stuff that was already in our printer. I printed out pictures in every size possible - from full page to wallet sized. Then, I cut them out:
I took a picture and laid it on the letter where I would like it. I either scrunched it or cut it to fit:
Then mod-podged it on:
I worked on the whole letter this way, one photo at a time:
Some areas, especially the curves, ended up looking crumpled:
But here is the fix:
Basically, work on the front first and don't pay too much attention to the inside of the letter. Then, once the front is finished, mod-podge more photos to the inside. This completely covers the scrunched areas.
Once all the photos were in place, I put a thin layer of mod-podge over the whole thing:
Here is my favorite part:
I love how some of the bigger pictures fold over the letter and cover both the front and the inside.
So here you go!
Here is the side view: And here is a picture of the scale all 23.5 inches of its glory and where it lives happily in my entry way.
Another Blogger's Post:
I thought it would be cute if the kiddo’s had their first initial hanging above their bed. I was originally just going to paint these, and then I thought it would be cuter if I mod podged photos of themselves on the letter. Kinda like a photo collage of their first 3 years.
So here's the tutorial:
I bought these cheap-o cardboard letters at Joanns. I think they were about $7-$8 a piece, and they are pretty big - about 2 feet tall.
Supplies:
mod podge
tons of photos
brush
scissors
I printed out a ton of photos (at least 50) on regular computer paper. Photo paper is much more stiff and a lot more difficult to work with, so I just used the stuff that was already in our printer. I printed out pictures in every size possible - from full page to wallet sized. Then, I cut them out:
I took a picture and laid it on the letter where I would like it. I either scrunched it or cut it to fit:
Then mod-podged it on:
I worked on the whole letter this way, one photo at a time:
Some areas, especially the curves, ended up looking crumpled:
But here is the fix:
Basically, work on the front first and don't pay too much attention to the inside of the letter. Then, once the front is finished, mod-podge more photos to the inside. This completely covers the scrunched areas.
Once all the photos were in place, I put a thin layer of mod-podge over the whole thing:
Here is my favorite part:
I love how some of the bigger pictures fold over the letter and cover both the front and the inside.
So here you go!
Subscribe to:
Posts (Atom)