Friday, April 2, 2010

No Bunny Loves Me Like Ewe Do Easter Banner

from: alittletipsey.com
1. I started by cutting out all my letters and backing them with card stock. I did it free hand, but you could use a stencil or print a font from your computer that you like. I made the Os eggs to add a little more Easter spirit. I punched holes in the tops to hang them with paper clips.

2. Next, I made a bunny out of paper and burlap. The whiskers are strands of burlap I pulled out of burlap fabric. I hot glued it all together.

3. I used a styrofoam heart and wrapped it with brown twine, then attached the heart and S with ribbon.


4. I made the dot for the i with paper and burlap. I cut out different shapes, bent up the edges and layered them using sticky foam spacers to give it more dimension.


5. I made the lamb or ewe from some incredibly soft fabric. Not sure what it's called but the back looks like fake tan suede. I cut out a cloud shape with a tail and added a little oval for an ear. Then, I added feet and a head with brown card stock.


I hot glued the pieces together and on to a piece of paper to add color and hold it together better.


6. Hang all the pieces from a ribbon with paper clips and you're done!

Thursday, April 1, 2010

Photo Ornaments For Your Tree

from: notsoidlehands.blogspot.com

These Oh-so-cute-and-super-easy-to-whip-up photo ornaments!


I saw some like these on my friend's Christmas tree a few years back and HAD to make some myself! I've made these as gifts for grandparents and we have TONS on our tree each year too :)

Start off with some:

• Plain glass ornaments (any size you want, but I like the 4in. (or 100mm) size since they are nice and big)
• Vellum
• Photo printer
• Some Big, Fat, Purdy ribbon

Open your pictures in Photoshop or other editing software and size them down to 4"x 4" and print out onto the vellum. (Sorry, but these pics printed kinda grainy)

Then, cut out in a 4in diameter circle. I cut a 4" circle out of cardstock (yup, using my Cricut) and used that as a pattern.

Then, roll it up and slip it into your ornament.

You can use a bamboo skewer to help get it in the perfect position, then i hold it in place with the topper (as shown).

The girls really wanted me to put snow into one of them.....and it actually looks pretty cute! Just add some till you like it (I used Martha Stewart snow glitter).

Now, top it off with a big fat ribbon......

and be sure to hang it in front of some lights on your tree so they shine through!

Be sure to make plenty for all the relatives and grandparents!

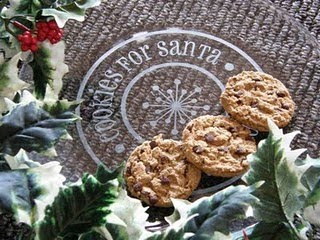
Glass Etching Tutorial {Cookies for Santa}

Use this beautiful glass etched "Cookies For Santa" plate for your Christmas Eve traditions. These would also be wonderful neighbor gifts!

What you’ll need:

-Clear Glass Plate (Walmart for only $1.50!)
 -Armor Etch (available at any local craft store)
-Paintbrush (that you can throw away)
-Disposable gloves
-Cookies for Santa Vinyl
Step 1

Clean your glass plate. Windex or warm water works well.

Peel your vinyl from sticker paper very slowly. It’s best to peel back not up.

Step 2

Place your vinyl image on your work surface sticky side up. Center your plate over vinyl and press down. This step is permanent so make sure the vinyl is where you want it before you press the plate on to it.

Step 3

Flip your plate over (rub any bubbles out) and peel off the paper slowly.

Step 4

PUT ON YOUR GLOVES! This Armor Etch stuff can burn your skin if you are not careful.

I bought this 10 oz. bottle of Armor Etch last Christmas when I did these plates for neighbor gifts and I still have enough left over to do 10 more plates. Point being, it lasts a LONG time.

Step 5

Using your paintbrush, gob (is that a word?) the Armor Etch on the vinyl with your paintbrush. Make sure not to get the Armor Etch on any other part of the plate. If you do, hurry and wipe it off with a dry paper towel.

Once it’s all covered, let it sit for 5 minutes.

Step 6

Next, take about 3 balled-up paper towels and (under warm water) wipe all the excess Armor Etch off your plate. The vinyl will begin to peel off and your plate will look like nothing happened because it’s wet.

Dry the plate and clean with Windex.

Now you have a beautiful plate for Santa!

Wedding Photo Centerpeice

I had my sweet hubby cut blocks for me. Then I painted them 2 coats of "linen". 

While the paint dried........I printed out and cut down some pics from their engagement photo shoot. Then, I used some "Aleene's Tacky Glue" (super cheap!) to stick the pics down. Regular glue or Mod Podge probably wouldn't work since the pics are thick.

On mine, I added some vinyl words to one side of each block to personalize them for the happy couple. You can also use stickers or rub-ons to add words to get a similar look.

Be sure to wait plenty of time to let the glue dry and then spray with a clear finishing spray or apply a few coats of Mod Podge.


BE SURE TO WAIT AT LEAST A WEEK BEFORE STACKING THESE OR THEY WILL STICK TOGETHER.........the finish needs time to cure. You don't want to spend all that time making these cute blocks only to have them stick together and rip your photos off.

Graduation Cap Candy

Graduation Caps ~ Bakerella

Ingredients Needed:
  • Airheads Extremes Rainbow Berry Sour Belts
  • Minature Reeses Peanut Butter Cups
  • Godiva chocolate squares
  • Sucker Sticks
  • Chocolate for melting
  • Candy Sprinkles
  • **see optional items for ingredients in post for colored caps

Airheads Extremes Rainbow Berry Sweetly Sour Belts! Ummm… Can you say mouthful? When I found these in the candy aisle at the drug store, I had to grab them. I knew I could find something fun to do with them.

And besides… they’re just plain pretty!  These were definitely the inspiration for the graduation caps. They make perfect tassles and give you color choices at the same time. Just cut apart each color strip with a knife.

Now, grab a bag of miniature Reese’s peanut butter cups. But, before you unwrap them, stick them in the freezer for a few minutes. It will make it easier to remove the wrapper and keep the sides looking pretty when you do.
 
If you remove the wrappers while the candies are room temperature, the sides sometimes come off with the wrapper like this. But that’s okay, because these rejects taste good.

After you unwrap them, place all the cups on a sheet of wax paper and let them get back to room temperature. When the chill is gone, dip the end of your lollipop stick in some melted candy coating and carefully insert into the candy cups. If they are too cold, the cups will split apart. Just insert the sticks about halfway and let dry.

Now, work on the tops. I used these small Godiva chocolate squares. They aren’t the cheapest little things, but the proportions were perfect and because they were individually wrapped, the edges were clean. I found them at a store called the World Market a while ago. Just draw a thin line of candy coating on top with a toothpick and glue on a short piece of the candy belt and a rainbow chip sprinkle in the same color to match.

When the tops are dry, glue them on the candy cups using some more of the candy coating and insert into a styrofoam block to finish drying.

Cute!

But, wait a minute. What if you don’t want brown graduation caps?

Or maybe you’re just dying to do the whole cake pop thing. Well, you’re in luck.

Grab some colored candy melts and get your hands on one of these square candy molds .

Pour some melted candy coating in each square and then drop it on the counter several times to flatten/smooth out the chocolate. Put them in the freezer for a few minutes and it will be easier to pop them out of the molds.

You can also use one of these medium size candy cup molds . I’ve shown them before with the Cake Bite Method. Just fill the bottom of the cup with some melted candy. Place small, chilled cake ball shapes (smaller than the width of the mold) and push them into the candy coating until the coating inches up the sides. That one on the right is how they look for the Cake Bite Method, but for these they should be almost flush with the height of the molds.

Then, cover the exposed areas with more melted candy coating. When covered, insert lollipop sticks about halfway in. By the way, using chilled cake balls here helps the sticks stand up straight when you insert them. Then place these in the freezer for a few minutes and when dry, they’ll pop out relatively easy. Don’t try to pull them out by the sticks, though. Push them out by pressing on the mold underneath.

Then, you can glue everything on. Instead of rainbow chip sprinkles, use a mini-size m&m because these hats are larger in size than the Reese’s version.

And there you have it… Colored Candy Covered Cake Ball Caps!

P.S. If you can’t find Airheads Extremes Rainbow Berry Sour Belts, then try pull apart Twizzlers. They are bigger and round, but if you cut them in half, I think you can glue them, flat side down.

ABC's In A Can

from: brownpaperpackages.blogspot.com
I have been excited to make this project for a couple of months now, I just love to personalize things--I think it makes everything more fun! This project is no exception. It also has the components that are perfect for little ones...the thickness of the juice can lids is just right for their hands, and the clink when they hit the bottom of the can is sure to please. It's also easy to do, and can be finished in a day. What a fun gift!


Here's how I did it!


ITEMS YOU NEED:
• #10 can (you could even use a formula can--they are a little smaller, but it would work)

• 26 frozen concentrate lids (My plan is to make more for numbers 1-10, so you would need 36 if you wanted to do this as well.)

• scrapbook paper

• 2 inch circle punch (this is optional, but makes it MUCH faster and easier)

• distress ink

• Mod Podge and foam brush

• ribbon

• hot glue gun

• drill

DIRECTIONS:

• Print the alphabet onto desired scrapbook paper. I did both upper and lowercase, using 2 different papers. The font is Century Gothic, sized to 100. I fit 8 of that size letter on a 8 1/2 x 11 piece of paper (I cut mine down from 12x12, since my printer doesn't accept that size), and it was just enough to cut the size of circles I needed.


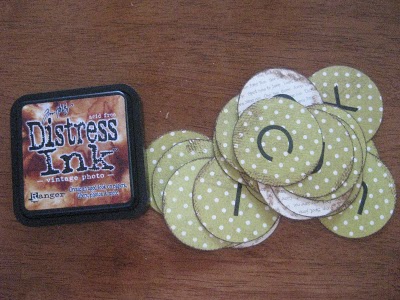
• Using your circle punch, center each letter in the middle of your circle and punch it out. I LOVE this punch by Fiskars--it allows you to see exactly what you are punching out, instead of doing it blindly. If you don't have a circle punch, you can always use a glass, trace around the letters, and cut them out.

• Once they are all cut out, distress them with distress ink.

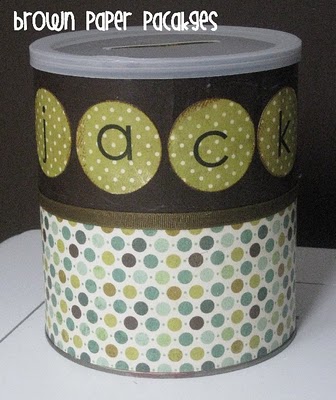
• Wash your lids well, then let them dry completely. Using a foam brush, apply Mod Podge to the bottom of the circle, then center it in the middle of the lid. Mod Podge over the top of the paper as well, and let dry. Once it's dry, you can repeat the process on the other side with the other set (lower or upper). Make sure you match up the letters on each lid--Dd, Ee, etc. **Because my boys' names don't have any repeating letters, I used the contrasting paper for the initials of their name. For example, the lowercase letters were done in the green polka dot paper, so for Jack's name, I used the cream paper for the lowercase j, a, c, and k. I did the same with Henry's name.

• While your letters are drying, you can move onto the can. I cut two coordinating papers into strips---3.5 x 12 inches. This wouldn't quite go around the can, so I cut another piece 3.25 x 7.25 inches to fill the gap. On my can, this made the edges meet up exactly--you will want to measure yours to see if that's accurate. I then distressed the edges of my paper. Apply Mod Podge to the bottom of the can, and place your paper on the can, pressing firmly, then add more Mod Podge on top of the paper. Add the second bottom piece, making sure the edges line up. Repeat the process for the top pieces. Let dry completely.

• After your paper is completely dry, you are ready to add any paper embellishments you like. I used the same letter circles to spell the boys' names--I loved the contrast of the papers. You could use also use vinyl, paint, etc. If you use paper like I did, use Mod Podge to secure it in place. Let dry.

• Hot glue your ribbon around the can, where the two papers meet.

• I used a drill for the slit on top of the can. I chose a thick drill bit (a little thicker than the thickness of the lid), and drilled two holes about 2.5 inches long--just a little longer than the width of the lid. Then I took a pencil and drew two lines--connecting the two holes, and forming a rectangle. You can then use an exact-o knife or razor blade to cut it out.

You're done! How darling and fun, plus educational...can't beat that!