Place an ordinary terra cotta pot upside down:
Spray with two coats of Blackboard Paint:
After 24 hours prep the surface by rubbing chalk over the whole surface then wiping it off:
Now you can write on it! See this pot I made for windowsill Basil?
Showing posts with label Projects. Show all posts
Showing posts with label Projects. Show all posts
Tuesday, September 7, 2010
Friday, August 6, 2010
Silhouettes
From: Simply Modern Mom
I started my wall decorations with this easy project of making silhouettes of all of us and framing it using fabric as the background. Cheap and easy fix to a plain wall. You will have to excuse the glare in the pictures. The frames are located at a super glare wall of our house. And I’m too cheap to go non-glare on the glass and just used the glass that came with the frames.
I used 11 x 14 inch frames because I wanted these to be big. Hence the thick frames too. I love chunky frames. Of course, when you make yours, you can adjust according to size. My secret to these silhouette frames is…
Supplies:
11 x 14 inch frames
profile photos of each person
black marker
scissors
white color pencil
black cardstock
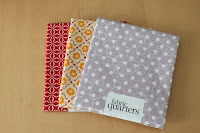
quarter fabric or scraps that are at least 14 x 17 inches
11 x 14 inch canvas panels
Mod Podge
sponge brush
glue gun
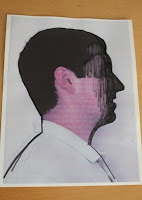
1. Take profile pictures of each person. Then print them out to the size you want them to be in the frames. I used my printer at home to print the profiles onto 8 1/2 x 11 inch printer paper and enlarged the photos to fit the paper.
2. Using the black marker, trace the profile of the images. You can blacken the face to get a better idea of the outline of the head.
3. Cut out the profiles.
4. Using the white color pencil, trace the cut out profiles onto black cardstock. Make sure you trace in the opposite direct you want your profiles to go in the frame.
5. Cut out the cardstock. The side you traced with white color pencil as the back and the profiles should be pointing in the right direction.
6. If you are doing 11 x 14 inch frames like me, then you cut your fabric to 14 x 17 inches. If not, then adjust according to size.
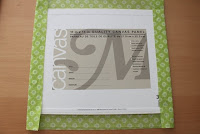
7. With the fabric wrong side up, place the canvas panel in the middle of the fabric. You should have a 1 1/2-inch excess all the way around.
8. Use the glue gun to glue the excess fabric in place to the back of the panel. I did two opposite sides first. Then fold the corners and glue in place. And finally glue the other two sides.
9. Now use Mod Podge to attach the silhouettes to the fabric canvas. Use a brayer to flatten the paper from center out to prevent bubbles. Or I just used my hands then set books and magazines on top to help it flatten as it dries. Then I Mod Podged the paper silhouettes so finish off. Careful not to get it on the fabric. Allow to completely dry before placing in frames. And done!
.JPG)
This was a fun little project. I took an ordinary frame that I got on clearance for a couple of dollars (sorry I don't have a before picture of the frame!). It was deeper than a normal frame, not quite as deep as a shadow box, but deep enough that I was able to add some material and some buttons underneath the glass.
Then I took two extra large unfinished wood letters. I used W's, but I think you could get M's to work depending on the font of the wooden letter.
I covered the letter with scrapbook paper using Mod Podge. LOVE the stuff! :) Then I inked the edges of the letter and applied a couple of coats of mod podge on top of the letters and paper.
I attached the letters to the bottom of the frame using E6000 and then I screwed small screws from the inside back of the frame down into the tops of the wooden letters.
I took a dowel and attached it with screws along the backside of the W's and then covered the screws with buttons.
I painted the dowels and the backside of the letters a cream color to match my frame. Then I ended up with this handy dandy lap tray. It works great for the kids to have a snack on or to draw on while watching tv or in bed or even in the car. Or maybe even for hubby to bring you breakfast in bed? Haha! One can dream ;)
Thursday, July 29, 2010
Mini Wallet
From: http://www.7layerstudio.typepad.com/
Tiny little wallets that fit just perfectly into the mini clutches from my first official pattern, The Infinity Tote.
It's perfect for the minimalist (like me) who wants just enough wallet to cart around a few credit cards, a bit o'change, and some greenbacks. After lugging a huge diaper bag around for 8 years with everything but the kitchen sink, it's so nice to be able to grab a tiny tote when I'm running a couple of errands or spending a day playing tourist.
It's also a great way to make use of extra little scraps you may have lying around, begging to be made into something useful and pretty.
The front pocket is designed for coins, the middle area is for bills, and
the back pocket holds credit cards/drivers license.
I feel like I should issue a bit of a warning about this little wallet, though - despite its benign appearance, it's not exactly a project for beginners. Not because of a lot of complicated pieces, but because it's so tiny that it's pretty hard to do a really good job constructing it. Any slight variance in seam allowance or the tiniest error in alignment will result in a glaringly obvious crooked pocket or flap, so be patient and do your very best when stitching it together to avoid problems.
I went through 5 prototypes (2 were complete rejects because things were crooked and didn't fit well together) to get all the measurements exactly right, so be precise! Cut the pieces EXACTLY square and to the measurements given. And be sure to sew EXACTLY 1/4" seams so the parts will fit together well.
Okay, I hope I didn't scare anybody too badly...I just wanted to give you a heads up so you didn't run into the same problems I did during construction.
The first step is to cut all the pieces. You can look at the finished product in photos above to see which fabric goes where, but basically you'll need 2 separate fabrics for the cover flap and main body of the bag, plus a long piece that will be doubled over to create your pockets. In this example, the blue dots fabric is for the pockets.
Main body (cut 2): 5" x 7 3/4"
Cover flap (cut 2): 5" x 2 1/2"
Pockets (cut 1): 5" x 12"
INTERFACING (heavy duty, fusible on one side like Pellon DuraBond):
Main body (cut 1): 4 1/2" x 7 1/4"
flap (cut 1): a scant 4 1/2" (meaning just shy of 4.5") x 2 1/4"
Fold interfacing in half, then trim along that line to create 2 perfect, uniform curves.
Fuse the interfacing to the backside of your chosen fabric. These will be the pieces that will be facing outward, not the lining pieces (although I must confess that I wasn't concentrating and accidentally sewed the flap for this wallet wrong-side out...I had intended for the little red-dotted "Seed" fabric to be facing out and, as you can see in the finished product, I did it wrong. Just in case you noticed and were confused about that.)
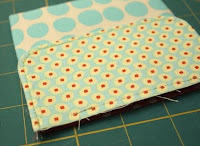
With right sides together, sew the short ends of the pocket fabric together to create a "tube". Put the 2 fabrics for the flap right sides together, and stitch VERY carefully all along the edge of the interfacing to create the curve. Be sure to backstitch at beginning and end.
Trim the seam around the flap very close (but not too close!) to where you just stitched.
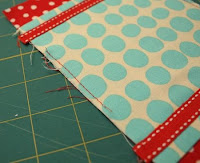
Turn the pocket "tube" right side out and press flat, with the seam right at the edge of one of the pocket sides. If desired, stitch ribbon along the edges of pocket as shown. Make sure ribbon is sewn on straight = a crooked ribbon will be very apparent later on.
NOTE: press the ribbon with a hot steam iron BEFORE stitching onto pocket fabric. Ribbon can shrink and could cause fabric to pucker if not pressed beforehand.
Turn flap right side out, press very carefully, and topstitch all along the sewn edge.
Reduce the stitch length to about a 2 so that you can navigate the corners more precisely, and go very slowly (sometimes I even "walk" the needle through the corner areas instead of using the foot mechanism) so you can do a good job.
Set aside.
Now, take the completed pocket fabric and center it on the Main Body fabric (the one with interfacing fused to it). Using a long stitch length (4 or 5), baste 1/16" away from edge for a few inches on either side of pocket fabric so that it won't shift when you sew up the sides. Take great care in making sure the pocket is sewn on straight. If it isn't, rip out the basting and do it again until it's straight so you won't end up with crooked pockets.
With right sides together, stitch up the sides of both the Liner and the Main Body fabric (the one you just basted the pockets to). Make sure that whatever version of 1/4" seam allowance (everyone sews 1/4" a little differently based on different machines) you use on one, you do the exact same to the other or they will not fit together properly. Clip the bottom corners slightly as shown above.
Leave the liner inside out as shown above.
Turn Main Body fabric right side out, press well.
Take your flap and baste it in place (1/16" seam) along the backside of the wallet.
Now, take the liner (which is still inside out) and slip it over the top of the wallet and flap so that the raw edges meet up exactly and the side seams match up.
Okay, this is the tricky part. Starting at where you basted the flap to the Main Body, stitch exactly 1/4" seam all the way around the wallet. If this seam varies at all, the wallet and flap will be crooked. Since it is so small, I recommend stitching it from the bottom inside as shown above, which is opposite of how I would normally stitch a bag.
Using a seam ripper, take out part of the side seam of the liner. Pull wallet out through this gap.
It will now look like this. Stitch up the gap either by slipstitching by hand or stitching close to the edge with machine like the photo above.
Tuck lining into wallet and press well.
To make the coin pocket gravity proof, take *Fusible* Velcro (especially designed for fabric, not the gummy stick-to-everything kind) and cut to about 4" long. If it's 3/4" wide, cut in half lengthwise to make a skinny strip. Following manufacturers directions, slip both sides of Velcro into pocket near the top and fuse in place. Let cool then make sure it fused properly.
If using a decorative button for the outside flap, sew in place now.
On the backside of the flap, sew on a little snap closure right over where the button thread is (to hide it) and then sew on the other half of the snap onto the pocket.
And there you have it! A customized, compact little wallet to brighten your spirits (and lighten the load in your purse) every time you pull it out.
Tiny little wallets that fit just perfectly into the mini clutches from my first official pattern, The Infinity Tote.
It's perfect for the minimalist (like me) who wants just enough wallet to cart around a few credit cards, a bit o'change, and some greenbacks. After lugging a huge diaper bag around for 8 years with everything but the kitchen sink, it's so nice to be able to grab a tiny tote when I'm running a couple of errands or spending a day playing tourist.
It's also a great way to make use of extra little scraps you may have lying around, begging to be made into something useful and pretty.
The front pocket is designed for coins, the middle area is for bills, and
the back pocket holds credit cards/drivers license.
I feel like I should issue a bit of a warning about this little wallet, though - despite its benign appearance, it's not exactly a project for beginners. Not because of a lot of complicated pieces, but because it's so tiny that it's pretty hard to do a really good job constructing it. Any slight variance in seam allowance or the tiniest error in alignment will result in a glaringly obvious crooked pocket or flap, so be patient and do your very best when stitching it together to avoid problems.
I went through 5 prototypes (2 were complete rejects because things were crooked and didn't fit well together) to get all the measurements exactly right, so be precise! Cut the pieces EXACTLY square and to the measurements given. And be sure to sew EXACTLY 1/4" seams so the parts will fit together well.
Okay, I hope I didn't scare anybody too badly...I just wanted to give you a heads up so you didn't run into the same problems I did during construction.
The first step is to cut all the pieces. You can look at the finished product in photos above to see which fabric goes where, but basically you'll need 2 separate fabrics for the cover flap and main body of the bag, plus a long piece that will be doubled over to create your pockets. In this example, the blue dots fabric is for the pockets.
Main body (cut 2): 5" x 7 3/4"
Cover flap (cut 2): 5" x 2 1/2"
Pockets (cut 1): 5" x 12"
INTERFACING (heavy duty, fusible on one side like Pellon DuraBond):
Main body (cut 1): 4 1/2" x 7 1/4"
flap (cut 1): a scant 4 1/2" (meaning just shy of 4.5") x 2 1/4"
HINT: To get a nice curve on the interfacing, use a spool of thread as a guide and trace around it on one corner.
Fold interfacing in half, then trim along that line to create 2 perfect, uniform curves.
Fuse the interfacing to the backside of your chosen fabric. These will be the pieces that will be facing outward, not the lining pieces (although I must confess that I wasn't concentrating and accidentally sewed the flap for this wallet wrong-side out...I had intended for the little red-dotted "Seed" fabric to be facing out and, as you can see in the finished product, I did it wrong. Just in case you noticed and were confused about that.)
With right sides together, sew the short ends of the pocket fabric together to create a "tube". Put the 2 fabrics for the flap right sides together, and stitch VERY carefully all along the edge of the interfacing to create the curve. Be sure to backstitch at beginning and end.
Trim the seam around the flap very close (but not too close!) to where you just stitched.
Turn the pocket "tube" right side out and press flat, with the seam right at the edge of one of the pocket sides. If desired, stitch ribbon along the edges of pocket as shown. Make sure ribbon is sewn on straight = a crooked ribbon will be very apparent later on.
NOTE: press the ribbon with a hot steam iron BEFORE stitching onto pocket fabric. Ribbon can shrink and could cause fabric to pucker if not pressed beforehand.
Turn flap right side out, press very carefully, and topstitch all along the sewn edge.
Reduce the stitch length to about a 2 so that you can navigate the corners more precisely, and go very slowly (sometimes I even "walk" the needle through the corner areas instead of using the foot mechanism) so you can do a good job.
Set aside.
Now, take the completed pocket fabric and center it on the Main Body fabric (the one with interfacing fused to it). Using a long stitch length (4 or 5), baste 1/16" away from edge for a few inches on either side of pocket fabric so that it won't shift when you sew up the sides. Take great care in making sure the pocket is sewn on straight. If it isn't, rip out the basting and do it again until it's straight so you won't end up with crooked pockets.
With right sides together, stitch up the sides of both the Liner and the Main Body fabric (the one you just basted the pockets to). Make sure that whatever version of 1/4" seam allowance (everyone sews 1/4" a little differently based on different machines) you use on one, you do the exact same to the other or they will not fit together properly. Clip the bottom corners slightly as shown above.
Leave the liner inside out as shown above.
Turn Main Body fabric right side out, press well.
Take your flap and baste it in place (1/16" seam) along the backside of the wallet.
Now, take the liner (which is still inside out) and slip it over the top of the wallet and flap so that the raw edges meet up exactly and the side seams match up.
Okay, this is the tricky part. Starting at where you basted the flap to the Main Body, stitch exactly 1/4" seam all the way around the wallet. If this seam varies at all, the wallet and flap will be crooked. Since it is so small, I recommend stitching it from the bottom inside as shown above, which is opposite of how I would normally stitch a bag.
Using a seam ripper, take out part of the side seam of the liner. Pull wallet out through this gap.
It will now look like this. Stitch up the gap either by slipstitching by hand or stitching close to the edge with machine like the photo above.
Tuck lining into wallet and press well.
To make the coin pocket gravity proof, take *Fusible* Velcro (especially designed for fabric, not the gummy stick-to-everything kind) and cut to about 4" long. If it's 3/4" wide, cut in half lengthwise to make a skinny strip. Following manufacturers directions, slip both sides of Velcro into pocket near the top and fuse in place. Let cool then make sure it fused properly.
If using a decorative button for the outside flap, sew in place now.
On the backside of the flap, sew on a little snap closure right over where the button thread is (to hide it) and then sew on the other half of the snap onto the pocket.
And there you have it! A customized, compact little wallet to brighten your spirits (and lighten the load in your purse) every time you pull it out.
Thursday, March 25, 2010
Monday, March 22, 2010
Dining Table Redo
From:
LOVE LOVE LOVE this idea!! Here is what you will need:
An old table
sander
paint
cricut cut words
So, Here's what she did:
When redoing furniture, I always start by taking the piece apart, as much as you can. So I removed the pedestals and placed the table top across one of my work tables. Then I Sanded the top completely down to the raw wood. Next, I used a hand sanding block around the edges and pedestals. Now I was ready for paint. I decided I wanted to put a quote on the table so I painted the table top a creamy white. I used Rustleum's Semi Gloss black for the pedestals and the edges of the table. When you have a lot of carving details, it's best to spray paint. Here's the pedestals, ready for their new top.
After the creamy white was dry I printed out an original quote on my cricut. Mr. Right drew lines on the table so I could put the quote on evenly. After approximately 6 coats of rolled on Behr Black Semi Gloss paint, I was able to start peeling the letters off. Here's a sneek peak...
If you look closely you can see the letters that are still under the paint. And here she is all done!
I used Harrington Font for the quote and all of the words are the same size.
Subscribe to:
Posts (Atom)


