Showing posts with label Valentine Projects. Show all posts

Thursday, January 20, 2011

Valentine Frames


Items You will Need:

Dollar Store Frames
E6000 Glue
Bag of marble accent marbles
Scrapbook paper


And the great thing is that you can take out the Valentine XOXO and store them, and then use the Dollar Tree frames again for a different project.


I also used a large black frame that I had and made a large heart for my mantle.

I was going to decoupage the frame, but discovered that I only have the shiny Mod Podge, so I will do that later.

I love that it is a very inexpensive project. I used frames I already had, plus one bag of floral marbles ($1.50), scrapbbook paper I already had and E6000.

This is what I did:


Took the pictures out of my Dollar Tree frames and traced the outline on my scrapbook paper.


Found a cup that was the right size for the O's and traced around it on two of the papers. Found the center on the other two papers and used a ruler to make an X.


Then I put a followed the outline on the X's and O's with a line of E6000 craft glue. I then put a line of marbles on the glue. Then I made another line on each of the X's and O's and put another line of marbles. And let them sit overnight to dry.


For the large heart, I cut out the scrapbook paper to fit inside the heart. Then I cut out another sheet of paper the same size using leftover paper (you will not keep this part so you could use plain copy paper). I folded that extra paper in half and then cut out a heart that was a little smaller than the paper. Then I traced that heart on the paper that goes inside the frame -- using pencil. After that I put a bunch of the E6000 inside the heart outline and then filled it in with marbles. And I let it sit overnight to dry.


The next day I put the paper inside of the frames. The glass that comes with the frames I put behind the paper with the marbles on it. This way I won't lose the glass if I want to use it again with the frame for another project.


I like the size of the glass marbles and the way they sparkle in the sun!

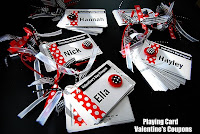
Valentine Project: Playing Card Coupon Booklets


This year I'm giving my little family Valentine Coupon books made out of a deck of playing cards.


I bought the playing cards at the grocery store. They were a double pack of cards for $1.99. Then I made the coupons. If you would like to use them, they are HERE. You can customize them and put whatever you want on your coupons.


I thought of each member of my family and what they would think is fun. Some of the coupons I made up were:

Kids:

• Lunch with Mom
• Movie and Popcorn
• Bowling with a Friend
• 1 Hour Computer Time
• Trip to the Ice Cream Shop
• Manicure
• Pedicure
• Mom will do your Chores for 1 Day
• Dad will do your Chore for 1 Day
• Trip to the Aquarium
• Breakfast in Bed
• Video Game Rental
• Video Night
• 1 Hour TV Time
• Trip to the Mall and a Pair of Earrings
• Shoe Shopping

Some for my Husband were:

• Back Rub
• Dessert of Your Choice
• Candlelit Dinner for Two
• Breakfast in Bed
• Night without Kids
• Foot Massage
• and a few unmentionables :)


First I printed off the coupons, trimmed them and attached them to the cards.

Then I punched a hole in the cards.


Then I took some big jewelry links and threaded the chain through the hole in the card.


Then I cut ten 5-inch lengths of ribbon and tied them on each of the round rings {found in the jewelry section of Micheal's}.


I then attached the round rings to the smaller jewelry links by opening up the links and then closing them when they were attached. If you can't find large round rings, you could use keychain rings (also found in the jewelry section).

The last thing I did was hot glue a vintage button on the top of each coupon book. And then cut the prongs off a fabric scrapbook brad and hot glued it on top of the button!

Wednesday, January 19, 2011

Valentine Heart Ball


From:  alittletipsy.com

I love candy so instead of just eating it, why not include it in my decor as well. I found a pack of these juju hearts for $1 at Smith's (Kroger) and knew they would be perfect for my heart ball. Ready for another super easy project?! Here we go...


Heart Ball

Supplies:
• Juju hearts (I got cherry because if they were cinnamon I would eat them all)
• Styrofoam ball (got it at the thrift store, about 3 inches)
• Pins
• White glue

1. Stick a pin half way in to the back of a heart, then insert the pin in the Styrofoam ball. **I would recommend dipping the pin in glue to make it hold better. I did not do this, but some of my hearts fell out when I was putting my display together. The glue will make them more secure.


2. I started with a clover leaf shape with all the heart points in and then alternated directions on the next row with the points in the spaces between the hearts.


3. Next, do a row with two with points up and one with bumps up. Line them up so the two with points up are on either side of a heart from the row above with the point down. The heart with the bumps up should align with the hearts from the row above with the bumps down.

4. Next row just alternates every other one again.

5. Turn the ball over and start steps 1-4 on the other side of the ball. You will have to get a little creative on that last row and just kind of put the hearts where they fit.

Now style that baby! It would be cute in a bowl with a couple of other balls.

I chose to use these treasures I found at D.I. I think it was a dollar for all of it. Spray it will a couple coats of magic...

and BAM!! Two little love birds and a little romance for your shelf.

Friday, March 19, 2010

Easy Fun Gifts

Idea/Tutorial from: HowDoesShe.com

Materials Needed:

2x4 pieces cut to 8 inches
scrapbook paper
vinal
ribbon
drill
Oreo Suckers


Mod podge on the paper. I used green for grass…polka dot grass…whatever:)

Sand it down. If you want to stain it this is where you’d do it. I didn’t because I didn’t want to:) I thought it looked good with out any stain.

Fresh NAKED wood!

I used the silhouette to cut the flowers and leaves. Aren’t they cute?

Drilled 4 holes. I didn’t measure I just guessed where to drill. I used a drill bit the same size as the the sucker stick.

If you are wondering how to make these suckers the tutorial on how to make them is in this too.


Add your happy spring vinyl!!!


Tie a fat ribbon around the block.

Stick your suckers in and TaDa!!!!

An easy and thrifty {{but they won’t know it}} gift to give to your whomever! It makes me smile…random gift giving. Giving because you are thinking about them, not because it’s a holiday.


Oreo Cookie Suckers


What you’ll need: Oreos, Sucker sticks, Melting Chocolate, Sprinkles, sucker bags, and bag ties.

Melt Chocolate in 30 seconds increments until melted, stir often. {Wilton}

Dip a sucker stick into your melted chocolate. Open an Oreo and gently press the chocolate coated stick into the frosting center. Put cookie back together and press gently… Let dry for a few minutes… Dip both sides of the cookie into melted chocolate. Place on wax paper…

and get decorating… sprinkle… Or drizzle melted chocolate out of a ziplock bag… Let Dry.


Wrap in cute little sucker baggies and twist tie shut…


Wednesday, February 24, 2010

Valentine’s Play-Dough

How cute are these? What a sweet idea instead of giving cookies or candy for Valentine’s Day , give a gift that keeps on giving, home made play-dough, recipe and a heart shaped cookie cutter . So if you are looking for a cute and sugar free gift check out how she did it !


Play Dough Recipe: