This lovely pattern is pieced and then appliquéd to a 16-1/2 inch square. The pattern can be made with two or four alternating colors or scraps left over from other projects. The block is made on an adjustable hand held square frame. For one block, you will need a 16-1/2 inch square of muslin (top), a 21 inch square of muslin (backing), two 2-1/2 x 16-1/2 and two 2-1/2 x 20-1/2 inch outside stripping, 20 pattern pieces and a 20-1/2 inch square of batting. The finished block measures 20 inches square.
206 Patchwork Quilt Patterns: The Famous Ruby McKim Book Plus A Bonus Of 105 Vintage Patterns.
Trace the pattern given onto lightweight cardboard or plastic. Be sure to add � inch on all sides for seams. Cut 20 pieces, 10 light and 10 dark, or 5 of 4 different fabrics. Using piecing stitch, piece these petals along the side seams, alternating colors, to form a circle. Turn outside edge in � inch and baste, leaving thread ends on top so they can be easily removed after the appliqu�ing is complete. Do the same with the center edge. Fold the 16-1/2 inch muslin square into fourths to find the center of the square. Being sure that the circle is perfectly centered, appliqu� the Dresden Plate circle onto the muslin using the hemming stitch. Add the 16-1/2 inch stripping on 2 opposite sides; the 20-1/2 inch strips on the remaining sides.
With a light pencil, trace the quilting pattern you prefer in the center and corners. The center looks attractive with a crisscross pattern, a monogram or a flower-like design. Quilting patterns can be found in needlework stores or be creative and design your own.
Assembling: Place muslin on frame and pin in the corners pulling taut. Add batting and top. Pin at corners through all three layers. Backing will extend 1/2 inch past top. Then pin in the middles of opposite sides, then the other two sides. As you pin, tug the backing slightly to keep the muslin tight. Continue to pin al the way around the quilt block.

Dresden Plate (Cut 20)
Add 1/4 inch on all sides for seams

Quilting: Using an arm's length of quilting thread and a number 7 or 8 quilting needle, knot the cut end. This will help prevent tangling. Pull the thread from the back and snap the knot through the backing into the batting so no knots show. You will hear the knot snap as it goes through. Be sure it doesn't come all the way through the top too. Using a quilting stitch (running stitch, 6-11 stitches per inch) follow the quilting diagram above, starting with the center and moving to the outside. Try to maintain even stitches. Small stitches are desired.
Finishing: You have now completed one block. This could be used as a pillow top by closing the outside seams, adding the backing of a pillow slip and a pillow form. Or you could use this as the first block of a sampler quilt or make an entire quilt using all Dresden Plate blocks. A twin size bed requires 8 blocks for a top; a double or queen, 12 blocks, a king, 16 blocks.
Sunday Best Quilt
by Darlene Zimmerman
Supplies
- Easy Dresden
- Bamboo Pointer & Creaser
Fabrics
- 2 1/2 yds. White Background
- 2/3 yd. Blue Solid
Variety of prints (can be fat quarters)
Cutting Directions
FROM CUT TO YIELD
White 12 14 1/2" squares
Variety Prints 5" strips 240 Easy Dresden wedges
62 2" x 14 1/2" rectangles
Blue Solid 20 3 1/2" squares
6 2 1/2" wide strips for double binding.
Assembling the Wedges
Fold a wedge in half the long way, right sides together. Sew a 1/4" seam across the top (widest edge) of the wedge on a short stitch setting (to prevent the seam from opening). Clip the corner of the seam by the fold, turn right side out, using the Bamboo Pointer Creaser. Center the seam in the middle of the wedge and press the point of the wedge. Repeat for the other wedges.
To assemble the wedges into circles, half circles or quarter circles, match the long sides of two wedges right sides together. Start sewing 1/4" in from the top of the wedge, backstitch to the edge of the wedge, then stitch forward to the end of the seam. By stitching in this manner you have backstitched the top edge of the wedge, while hiding the thread ends inside the wedge.
Twenty wedges make up a circle, 10 a half circle, 5 a quarter circle. Make one circle, 4 half circles and 4 quarter circles. Press all the seams one direction.
Assembling the Blocks
Crease the background square in half and quarters. This marks the center of all 4 sides. Center the point of every fifth wedge on a crease. Pin and baste in position.
Appliqué in place by hand using a neutral thread that will blend into the fabrics, or set your sewing machine to stitch a small zigzag, and shorten the stitch length slightly. Using a neutral thread or an invisible thread on top, stitch slowly along the very edge of the wedges, catching both the wedge and the background fabric. Another option would be to baste the Dresden Plate in place and simply quilt in the ditch between each wedge later to hold the plate in position.
Using the circle template given in the tool instructions cut a template from cardboard, mylar or freezer paper. If using freezer paper, iron the circle to the wrong side of the blue fabric. Cut out, adding a scant 1/4" seam allowance. Center the circle on the plate and appliqué in place by hand or by using the machine method given above. Remove the freezer paper by slitting the back, or remove it before the last inch is stitched.
If using mylar or cardboard, use the template to draw around on the wrong side of the fabric. Cut out the circle, adding a scant 1/4" seam allowance. Press the seam allowance around the edge of the template, then appliqué in place.
Assembling the Quilt
Sew the long edges of two sashing strips together, making a pair. Repeat for the remainder of the sashing strips to make a total of 31 pairs.
Make 4 rows of 3 blocks with 4 sashing strips.

Make 5 horizontal rows of 3 sashing strips and 4 blue corner squares.
Join the rows of blocks and rows of sashing strips.
Finishing the Quilt

Don't forget to sign and date your quilt!
Enjoy!
Top of page

Finished Size 12" x 12"
Download Templates Click here to download a .pdf with templates. (Problems downloading our .pdf? Click here for troubleshooting tips.)
Cutting Instructions listed on Template Diagrams.
Assembly Instructions
Step 1. Layer background and print Template A triangles, right sides together. Sew pieces together (Diagram I); press seam allowance toward print fabric. Make 8.

Diagram I
Step 2. Layer background and print Template B triangles, right sides together. Sew pieces together (Diagram II); press seam allowance toward print fabric. Make 4.

Diagram II
Step 3. Using Diagram III as a guide, assemble Crown units. Make 4.

Diagram III
Step 5. Using Diagram IV as a guide, assemble rows. Sew rows together to make Cross and Crown Block.

Diagram IV
Skill Level INTERMEDIATE
Finished Size 16" x 16"
Download Templates Click here to download a .pdf of the templates. (Problems downloading our .pdf? Click here for troubleshooting tips.)
Cutting Instructions:
Background Print
... 1 square 17" x 17"
Red Print
... 10 Template A
Blue Print #1
... 10 Template A
Blue Print #2
... 1 Template B
ASSEMBLY INSTRUCTIONS
Step 1. Referring to Diagram I, stitch together 10 red print Template A fabrics and 10 blue print #1 Template A fabrics, alternating colors, stopping 1/4" from outside curved edge.

Diagram I
Step 2. Finger-press white 17" square in half on both length and width (see Diagram II). Using folds as placement guide, position pieced center and appliqué outer edge in place using appliqué method of choice. Appliqué Blue print #2 Template B fabric to complete Dresden Plate Block. Trim blocks to 16 1/2" square.

Diagram II

Bonus Pattern
Block Size: 15" Finished
Cutting Instructions:
Background
... 1 square 17" x 17" (oversized)
Pink print
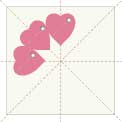
... 8 hearts (Template Diagram) PDF format
Block Size: 15" Finished
Piecing the block
Step 1. Referring to Diagrams I and II, fold and finger-press creases in 17" background square.

Diagram I

Diagram II
Step 2. Prepare hearts for appliquéing to background square, using method of choice. Using finger-creased lines as a guide, place first three hearts on background square. Adjust hearts, keeping centers aligned on creased lines, until the edges touch each other (Diagram III). Pin in place and then appliqué to square.
Step 3. Repeat Step 2 for the remaining hearts, aligning two at a time (Diagram IV), rather than three. Trim background fabric to 15 1/2" x 15 1/2" square after all hearts have been appliquéd into place.
Pattern for a Dresden Plate Block Quilt

This Dresden Plate pattern gives you some choices. The basic pattern uses two variations but you are welcome to use just one or the other. On the history page I showed you the curved end or sharp end variations. In this pattern I've combined the two.
Be sure you read The Dresden Plate Quilt Pattern and it's History before starting your quilt. You will find making this quilt will be more meaningful and fun once you know the pattern's background.
Variarions and How to Use the PDF
I've designed a 10 inch block but if you want blocks of another size you can resize the applique templates on a copy machine. You will find the templates at Dresden Plate PDF. It is very important that you set the "page scaling" to "none" before you print the PDF so it will come out the right size!

Use your favorite applique method. If you are fusing the applique cut on the inner template line. All others cut at the outer line so that you will have fabric to turn under. The seam line is set at 1/4 inch but you may prefer to make it narrower.
For hand applique methods the McCall's Quiltmaking Fundamentals is very helpful. I like to use fusing when I machine applique and McCall's Quilting: Fusible Machine Appliqué has a good lesson on this.
Find the center of each block to help you position your applique. There will be a little white space all around the finished block.

In making this quilt, you can adjust the size by how many blocks you use.
In the example shown above I've added a white border to give a little more white space around the edges of the quilt. I've seen this on quilts of the period but in truth they did borders a great many ways. You could even put sashing between the blocks if you wish.
A truly fancy Dresden Plate Quilt would have had an Ice Cream Cone border around it like the one pictured to the left. If you decide to make one you need to be a skilled quilt maker or very brave. The trick is getting the cones to come out even at the corners. Since people will be making different sized quilts I realized there is no way I could make a border pattern to fit for all. But I did put together a template for the cone and the alternate plain triangle. Hopefully it will help get you started. It's on this Ice Cream Cone Border PDF. You could make it bigger or smaller. After you have set the size you want add a 3/4 inch seam. You will probably have to add some plain border to get the right length for the finished cones. It would take some experimenting.


.jpg)
.jpg)
.jpg)
.jpg)
.jpg)
.jpg)
.jpg)
.jpg)
.jpg)
.jpg)
.jpg)
.jpg)
.jpg)
.jpg)
.jpg)
.jpg)
.jpg)
.jpg)


