
You will need:
2 twin flat sheets {matching, for side walls}
1 twin fitted sheet (or flat) {for tent top}
1 queen flat sheet {for scallop}
3 packages of 1/2" double fold bias tape
35"-36" hula hoop

Start by cutting your pattern piece for the tent top. Cut a string to 30". Take the string and hold it on a scrap piece of fabric to make the pattern. Hold the pencil at the end of the 30" length and pull taut. Make a mark to remember where you started. Holding the pencil, swing the pencil, keeping it taut and draw a line (it will be arced) to the other 30" line. Your arc will be 28.75" in length (run a fabric tape along the arc line to make sure right)


Fold the sheet in half to make it easier. Measure up from the large hem 7 feet.
Cut off the excess. Set aside until we need it again


Now take the top strap (made one by using a 9"x2" piece of fabric, stitched RST and turned right side out and pressed) and place it right over the seam you just made. pin the next triangle down, making sure to sew on strap. Sew the next triangle in the same manner, making sure not to catch strap


All pieces sewn and strap is lookin' good. Set aside until we need it again

Take the queen sheet you are using for the scallop and fold it squarely and straight so it is easier to cut. You want to cut the longest side (102") to get the maximum length. Cut 3 pieces 9" wide. You end up with 3 9" wide and 102" long pieces. Trim off the large 4" hem (the one that is normally at the top of the sheet) So now your piece of fabric is 98" long. Your scallop needs to be 120" long, so take one of the other 9" piece you cut and cut off 22" to attach it to this one.
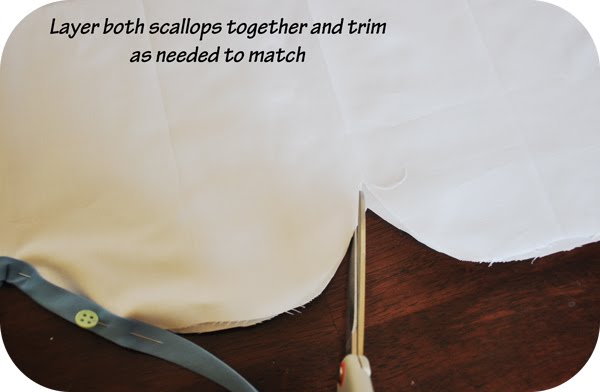
Make two of these. You will be layering them together.


Take one of your 120" x 9" pieces and start folding it accordion style. Make sure to press each fold so it keeps its measurements. Take care to keep the measurement at 3" every time you fold as seen above


Sew using a 5"8 seam to allow for room in the future

Now, take the sewn up tent top that has the scallop now sewn to it and place it right side down on top of the tent walls that you had sewn together earlier. Again, make sure to line up the back wall seam to the back tent top seam here. You will not pin it to the very top. Use a scrap piece of fabric cut to 5.5" as a marker. Take that marker and measure from the top of the tent wall down and pin the tent top there. Pin all the way around, using this method. I pinned about 1/4 way around to one side, then I went around to the front and started pinning. In the front , you want to gather up the fabric a little to create a drape look. In the measurement( 120") I deliberately made it a little longer so we can have that drape effect.

Here is the tent top fully pinned to the tent walls with the 5.5" excess
(will be used for the hoop pocket)
Now, you will be able to use the original seam and use it as a guide to sew now. Sew just inside that original seam. I sewed about 1/4 inch away from it. It is very important to go slow and check under all the fabric to make sure you are not catching fabric that should not be sewn. Again, slow and check!

Turn right side out to check your work.....we're getting there!

Turn back inside out and find the seam you just sewed

Iron that 5.5" hem under a 1/2" and then fold it over and using the stitches you just sewed as a guide, pin it to the same seam allowance (the 5/8" one)

Here we go again, sew in between these two stitches. Again, making sure not to catch anything under that shouldn't be there...take your time


Fish the hula hoop thru the pocket you just made. Once you get it all the way in, grab some duct tape and tape it back together

Here's the view from inside looking up


Stand back and admire your work

No comments:
Post a Comment