{Blogging Tip #3 - How to Add a Menu Bar - Part TWO}
Now that you know how to add more page elements to your blog, I'm going to take you one step further. Here are instructions on how to actually add the menu bar graphics that I talked about in this tutorial.
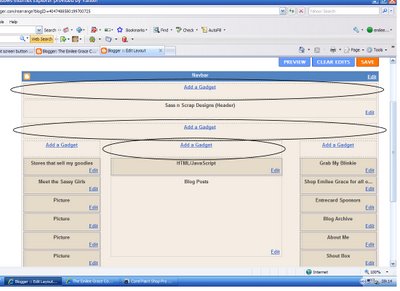
Just to recap Part One, your layout tab should now look like this:
Right below your header (or above if you want) is where you are going to add your menu bar. The first thing you need to do is open up your photo editing software. I use Paint Shop Pro. Others use Photoshop. You can even download a free program called Paint.net. Now you are going to create your graphics. As you can see on my blog, I just used plain words in the fonts that I love. Your menu bar can contain links to anything you want. It can link to certain pages in your blog. It can link to your store if you have one. It can link to another blog. Pretty much anything that has a url, it can link to. **You are going to have to play around with the size of each button depending on how wide your blog is and how many menu buttons you want. I used 200px by 50px and it worked out fine for my blog.
Once you have all of your graphics created, you now need to upload them to a site like Photobucket so that it can generate the HTML code that you will need when adding a gadget. Once you do that you will see 4 codes below each of your graphics. The one you want to click on and COPY is the HTML code as pictured below.

Once you have copied that code, you are going to go into your layout tab in blogger and "Add a Gadget". When this box comes up, you are going to select HTML/Java Script. *Note:You are not going to name your gadget. If you do, it will show up above your menu bar and it won't look right. Leave the "Title" blank.

A box will come up and here is where you are going to add all of the HTML codes that you have copied from Photobucket (one at a time) to make your menu bar.

Still with me?? We're almost done! Feel free to save and take a look at your blog. If it's to your liking, it's time to move on to linking each button with the page of your choice.
Now that your menu bar is in place, you are going to go back in and EDIT. Notice where it says "Rich Text" in blue? Click on that.

Now you should be able to see all of your nice menu button graphics.

Click on each one and then click on the icon that looks like a little world with a chain on top (it's right next to the "i". A box will pop up and here is where you enter the url of the page you want that particular button to link to. Click OK. Once you are finished doing this to each link, click SAVE. You're done!
How do you make the link come up in the current window instead of opening a new one?
The problem is that I can't link more than one post to each button. Like, I have a "recipes" button, but I can't get it to link to all of my recipes, just the one post.
Answer: you need to make sure that within your code the target says _self for same window. If you want it to open in a new window you'd use _new. Hope that helps! :)
Restorative Living - what you need to do is give your recipes all the same label. For example, give them all the label "receipes". Then when you are at your own blog, click on the label "recipes". This should bring up all of your posts using that label. Copy the url from your browser and use that to link your button up to. From there on out, when someone clicks on your recipes button, all of your posts that use the label "recipes" will come up. Hope that makes sense. Let me know how it goes. :)

No comments:
Post a Comment