Basic Quiltmaking Supplies!

Before we get started talking about making our quilt, let's talk about the basic supplies you'll need.
#1: Rotary cutter, ruler, and mat.
If you don't own these items, please -- buy, beg, or borrow ! No matter how accurate you try to be, cutting with scissors is NEVER as accurate as cutting with a rotary cutter -- and accuracy is VITAL for a successful quilt. ALSO -- rotary cutting is a million (okay maybe not quite a million) times faster!!!!
You can often purchase all three of these items together in a set, and if you shop at JoAnns you can use a 40% off coupon!
~ Having a nice sharp blade in your rotary cutter is an absolute necessity. You will want to cut through multiple layers of fabric at one time for maximum speed and efficiency. (I'll talk more about cutting later.)
~ I use a 24"x36" mat. I cannot live without it! If you do not own a cutting mat, I strongly suggest you go for the larger size. It makes cutting so much easier!
~ I own a few different rotary-cutting rulers, but absolutely prefer my 6"x24" ruler over all of them. Using a ruler of this size makes cutting so much easier! Please use a ruler that is meant for rotary cutting. Using a metal ruler will dull your blade in an instant. Plastic rulers just aren't strong enough and will end up getting dinged by your rotary cutter blade -- which will, in turn, dull your blade. Rotary cutting rulers are clear acrylic, and have measuring grids on them.
AGAIN -- making quilts = lots of cutting! Make it easy on yourself by having the right tools for the job!

#2: Iron.
I hope everyone owns one of these already!

#3: Ironing Board.

#4: 1/4" Sewing Machine Foot.
This isn't a necessity, but it's nice. This is the foot that spends the most time on my sewing machine... aside from my free-motion foot, that is!

I continue my quest to convince you that you CANNOT live without one of these babies!!
When it comes to quilting a quilt, using one of these feet is WWWAAAAAAYYY easier than using a regular foot! I, for one, do my best to avoid straight-line quilting. It takes too long, it's physically much more cumbersome to do, and... for most quilts free-motion is just better. The end. :o)

You will need safety pins when it's quilting time. There are a few kinds out there. The bendy pin on the right is supposedly better for basting quilts. I find that the only difference between the two kinds is that the bendy ones are more expensive. Don't waste your money. ALSO -- get the smaller size of safety pins!! The larger pins just won't do the job as well! One more thing: It's no secret that I love the dollar store, BUT -- don't buy safety pins at the dollar store. They aren't as sharp as the ones you will get at, say, JoAnns. They will frustrate you and possibly damage your fabric.
#7: Masking Tape.
You will need this when it comes time to baste your quilt together. I confess I use dollar store masking tape. It works fine most of the time, although there are certainly some versions that are less sticky. Some people use packing tape instead of masking tape. Either kind works. More on this later.
#8: Sewing Pins.
I hate pinning. But sometimes there is no way around it. You do need pins. (Sigh.)
QUESTIONS:
- Do acrylic rulers wear out? Absolutely! I've had mine for somewhere around four years. Its edge has seen much happier days. One corner is broken off. I've actually dinged it with my rotary cutter. The one I had before that sadly bit the dust as well. I am definitely taking advantage of the 50% off quilting supplies sale going on now at JoAnn's and getting myself a new one -- I've needed it for a while now, and there's no reason to wait any longer!
- Rotary Cutting Mat: 24"x36" versus 18"x24". Bigger is better! There are arguments that you really don't need those extra inches. I contend that maybe you do. I have both sizes, but use my larger mat almost exclusively.
(1). I cut my yardage folded in half -- folding it basically the same way it comes on the bolt. Quilting fabric is about 44" wide. If you line up the folded edge on the 1" line of your smaller mat (has to be on the 1" line and not the 0 line, or you can't see the numbers and registration lines!), the selvage edge ends up covering the numbers on the other side -- in most cases. You don't want to cut blind. Yes, you CAN peek under the edge of your fabric to line up your ruler and still get a decent cut. But you risk moving your fabric out of alignment. Or, you could fold your fabric again and cut. But the more you fold your fabric for cutting, the more you run the risk of ending up with lines that aren't straight.
(2). On the larger mat you can do more rows of cutting without disturbing your fabric -- lifting and moving it so you can do additional cuts. The less you have to move your fabric, the more confident you can be that you are cutting accurately.
So, maybe it sounds like my reasons are purely for laziness. But I think using the larger mat saves time and headache. And it's pretty much a one-time purchase. Your mat will last you for years.
Will anything bad happen if you decide to use a smaller mat? I doubt it. If smaller is what you have, use it. If smaller is easier on your budget, go for it.
- What brand of cutting mat is best?
- Where do I get sewing machine feet, and how do I know they will work with my machine?
First -- My machine is not a fancy-schmancy machine. It's not a longarm machine. It's not an embroidery machine. It is a basic machine. You can quilt on your basic machine. My mom's machine is around 40 years old -- she quilts on it. My sister-in-law has a basic machine, and quilts on it. My sister has a 30+ year-old machine, and quilts on it. The only special thing you need is the foot!
As Denise from NITTINFOOL suggested in the comments of Susan's post, take your presser foot off your machine and take it with you to a sewing machine shop. That way there will be no question as to what type of foot shank your machine takes. (For example, there is a Bernina shop in my area that is absolutely phenomenal.) Ask someone at a specialty shop who knows what they are talking about. Don't take it to JoAnn's. (Love ya, JoAnn's, but helping poor unsuspecting and unsure customers is not your forte!) If you need to go online to find what you need -- make sure you know the make and model of your machine, and what kind of shank your feet have (high or low). There's a wealth of information online, and I am confident you can find what you need!
- Walking Foot:
You might tie your quilt. Is this because you are nervous about quilting it? Don't be nervous about quilting it!! Please, I am convinced you will be SO much happier with your quilt if you quilt it than if you tie it! You can straight-line quilt it with your regular foot!
So... What is the quilt we are making?
First let's have a look at some
All of the quilts in this post were made using THE SAME SUPER EASY PATTERN.

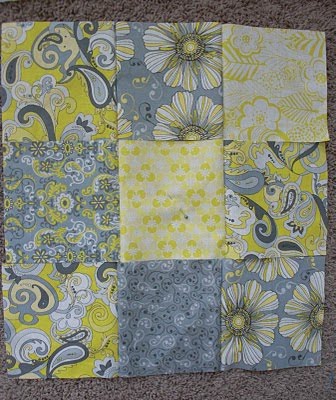
It's called Disappearing Nine-Patch!
I know, I know, this pattern has made its rounds on the web already. But it is PERFECT as a beginner quilt!
1. It's easy -- from cutting to sewing, a beginner can DEFINITELY handle it
2. It doesn't LOOK too beginner-y
3. It's incredibly VERSATILE -- you can get very different looks depending on what fabrics you choose and where you place them.
Okay -- Let's talk fabrics, and what you'll need!
Your quilt will end up about 45"x60". This is considered "crib size," although I find it to be the perfect size for a lap quilt, or for snuggling under on the couch. This is a great size to start with, as it will be manageable for you to quilt, you can purchase a prepackaged batting in this size, and it is possible to avoid piecing fabric together for the backing.
I suggest using 9 to 10 fabrics in your quilt to make your layout easier later on in the process. (This way you are more likely NOT to end up with the same fabrics touching each other in your layout. If that doesn't make sense, ignore me until later!)

(I wish you could see it in person -- the colors are so much more vibrant and fun than the photos show!) I used a total of 10 fabrics. It has a 2" border.

I just LOVE those happy colors -- and those hedgehogs!!
Since my quilt is pretty much exactly 45" wide, I pieced together a strip on the back. (45" wide fabric isn't actually 45" of usable space -- you can safely plan on only 42"!) My measurements include everything you need to make this quilt.
**I will give different measurements for a slightly easier quilt -- with no borders, no pieced strip on the back, and no pieced binding -- later in this post, SO if you're scared of any of that -- stay with me!**
What You Need:
- Eight 1/4 yard cuts and two 1/3 yard cuts of fabric for the blocks, binding, and pieced strip for the back. (Your two 1/3 yard cuts will yield more blocks on the front, so pick your two favorites here!)
- 3/8 yard cut of fabric for the border (I duplicated one of the fabrics for my blocks here)
- 1 3/4 yards for the backing
What is the difference between a 1/4 yard cut of fabric and a Fat Quarter of fabric? Are they the same? Can I just get Fat Quarters instead of quarter yards?
A quarter yard of fabric is 9"x45(ish)". A Fat Quarter has the same amount of fabric, but it is 18"x22". Even though they have the same amont of fabric, they are not interchangeable in most patterns. Besides, Fat Quarters are generally more expensive than 1/4 yard cuts.
Choosing fabrics: Pick 10 fabrics that coordinate together nicely. You really can't go wrong here -- just pick fabrics you love! If you are nervous about selecting fabrics, the easiest route is to pick from a fabric collection you like -- they are already pre-coordinated for you!
A suggestion: Avoid stripes and plaids for your first quilt. Why? If your cuts aren't perfectly on-line with the pattern of the fabric, it could be distracting, and you may be disappointed. By choosing all-over prints, you will avoid any of that trouble. Just a suggestion; ignore me if you like! :o)
One more suggestion: If you are nervous about picking out a border and backing already, or have trouble committing to a border and back before you've gotten your blocks together, just get the fabric for the blocks. This is the way I normally operate when making quilts -- I have to see the blocks together before I can decide what I want the border to be!
**Okay, I promised measurements for a simpler design -- here they are!**
If you want to make a quilt with no borders, no pieced binding, and no pieced back, here is what you need:
- Nine Fat Quarters that coordinate nicely for the front
- 3/8 yard cut of fabric for the binding
- 1 2/3 yards fabric for the back
- (Note that by omitting the borders, your quilt will end up a few inches shorter on each side.)
CUTTING
Here are my fabrics! I'm in love!!


Rotary Cutters are SHARP. I cut myself with one 15 years ago. It was not pretty, and there is still slight nerve damage.
BE. CAREFUL.
You want to set up your cutting mat in a place where you can get around three sides. You want to always cut away from yourself -- never left-to-right across your body, towards yourself, etc. I put mine on my kitchen table.

Basic cutting tips:
Place your fabric against a line on your mat. Extend your ruler over the top...

...and bottom edge of your cut, aligning the edge of your ruler with the line on the mat. (This is why that longer ruler and longer mat are SO handy!)

Okay, on to cutting OUR fabrics!
There is a lot out there on the web about grainline and how to find it, how to straighten it, and how to cut the RIGHT way when considering your grainline. Don't get me wrong -- the grainline IS important.
But maybe not AS important in a quilt as in an article of clothing!
Here's how we will cut our fabrics:

(If your fabric is wrinkled, press it. Wrinkles make for very bad cuts! Keep it folded when you press, but do not press the foldline.) I DO check to see if my fabric is folded on-grain. It's usually right on, or at least "close enough!" I line up my fabric as shown in the photo, with the fold lined up exactly on one of the lines of the mat at the left.
A quick thought on the fine ladies who cut fabric at the store. Most are good. Some are notoriously bad. (There are a few I recognize and try to avoid when it's my turn to have my fabric cut!) If you are starting with a bad cut (i.e. you didn't get the full amount of fabric you paid for), it can be EXTREMELY frustrating. I even had a few bad cuts in my current batch of fabric -- which is from one of my favorite quilting shops! I even ended up taking one of the cuts back -- it was simply unusable!
Here is what to check: You want the top edge of your fabric to slightly overlap a line. Check to see that both layers of your fabric are overlapping just a tiny bit -- you are going to re-cut that line perpendicular to your fold. On your 1/3 yard cut (which is what I have shown in the photo), be sure you have a full 12" of fabric. If not, take it back and complain! :o) You will also re-trim the bottom edge. Make sure both layers of fabric are overlapping that bottom line, too!

For your two 1/3-yard cuts of fabric:
Trim the top edge first. Then go down 6" and cut, creating a 6" strip. Then down 6" more to cut a second 6" strip.
Aaaaaannnnnnd..... I've screwed it up already -- on the FIRST cut of my quilt!! Measure TWICE, cut ONCE, ladies!! I cut a 5" strip instead of a 6" strip! BLAST!! Back to the store to buy more!!

(Pretend you see two rows of the same thing here! I have scooted the squares around so you can see where I cut.)
Move away your top and bottom trimmed bits. Don't disturb your two 6" strips!
Starting 3" over from the fold, make your first vertical cut. Then cut in 6" increments for the remainder of your two strips. You will end up with a total of fourteen 6" squares. Repeat for your other 1/3-yard cut of fabric.


Line up your fabric with the fold at the left, lined up on one of your mat lines. (Make sure you have a full 9" of fabric to work with!) Trim the top edge. Go 6" down and cut. Go 3" down and cut. You will have a 6" strip and a 3" strip.
NOW, move your 3" strip out of the way! If you want to go ahead and trim off your selvages, just scoot it down a little bit and trim them off. Use your ruler and be sure to cut them off squarely! Set your strips aside -- they will be used later for your binding and for the pieced strip on the back of your quilt.
You will then cut your 6" strip into seven 6" squares, the same way you cut your squares from your 1/3"-yard cuts of fabric.

When all your cutting is done you should have eight 3" strips and 84 6" squares! YAY!!!
Now that you've got your squares all cut out, it's time to start assembling nine-patches!
There is no exact science to this. We are making a scrappy quilt, so everything can for the most part be pieced together randomly.
We will start by assembling rows of three squares.


One quick note about your blocks... Keep in mind that if you have a particular fabric whose squares you want to keep whole, you will need to place them on the ends of your rows -- never in centers.
Open each pair and sew a third square to each, chain piecing as before.

(Remember -- you are not pressing yet! We'll do it later!)
Next you will lay out and arrange your nine-patches. This is one of the fun parts of the process!

You may want to keep this little diagram in mind as you lay out your squares:

Only the squares in the corners will not be cut -- all others will!

You're set for the next step
I have neglected to mention that for your quilt you will need a "crib size" (45"x60") batting. Packaged batting is on sale at JoAnn's for 40% off through April 24th -- only a few more days -- so I figured I'd better talk about batting now so you have a chance to hit the sale!
Let's quickly talk about batting choices. Many people, when making their first quilt, imagine a super thick, fluffy blanket -- more like a comforter -- and end up purchasing the thickest, fluffiest batting they can find. Don't do it! You are looking for a low-loft (thin) batting -- 1/4" "loft height" or less. (You can find the loft height on the packaging.) If you try a super thick batting you will get yourself into trouble on the quilting -- it just isn't going to work!
**Let's talk fiber content**
Most quilters prefer a 100% cotton batting. There are also 100% polyester battings and 100% wool battings, and even 100% bamboo battings.
I have used cotton, polyester, and cotton/polyester blends in my quilts. I have not tried wool or bamboo -- I feel that wool would be way too warm, and bamboo is about twice the cost of the cotton and polyester battings.
My current preference? I like the cotton, but in a finished quilt I honestly prefer the texture and weight of an 80/20 cotton/polyester blend. JoAnns carries a brand I am happy with at a decent price -- and since it is at JoAnn's I can either get it on sale or use my 40% off mailer coupon. Score!
We won't need batting until a few more steps down the road, but now may be a good time to pick yours up!
BLOCK ASSEMBLY
Let's finish our nine-patches!First we need to talk about pressing....
There are two schools of thought with regard to pressing seam allowances in quilts. The traditional method is to press all seam allowances to the side. Recently more and more quilters are pressing seams open. I have tried both methods. There are certain instances where pressing open works best for distributing bulky seams, but for the most part it's all a matter of preference!
For this quilt I am going to show how to press seams to the side.

Start with one of your nine-patch stacks of three rows. Place them along the far edge of your ironing board.

Flip the top row down, keeping the left square at the left, and the right square at the right. You are going to press your seam allowances to the left, as shown.
Be careful not to stretch and distort your fabric as you press -- it is best to lift and press your iron, not set it down and use a side-to-side motion.


Repeat for the row 3, pressing the seam allowances to the left.
(If you haven't caught on yet, the idea is to alternate the direction you press the seam allowances for each row.)

It's time to complete your nine-patch blocks!


Sew this row onto your block using the same finger pinning technique.

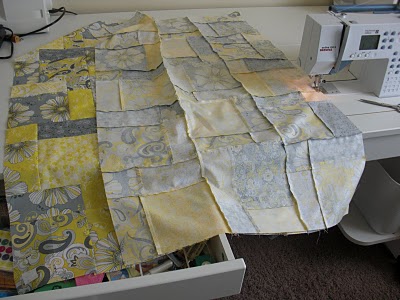
Putting Rows Together
Lay out all your rows on the floor, in order. (I'm only showing my first two rows here.) You will sew together two rows at a time, matching up seams and "finger pinning" as before to get the corners of your blocks to line up. It is easiest to press after sewing each seam rather than after the entire top is together.


It's working!!


Hi Blenda! I loved this pattern so much that I featured it on the FaveCrafts blog with full credit to you. Check it out here: http://www.favecrafts.com/blog/fc/nine-patch-quilts-for-summer/.
ReplyDelete